Sunday, December 6, 2009

Pumpkin Cookies


I meant to post this prior to Thanksgiving. Yeah this whole working full time thing has really cut into my blogging time. Sorry for the delay. Pumpkin is a fall vegetable and these cookies are wonderful for Thanksgiving or Christmas.

I have been making these for probably 30 years. They are a little different in that they are very light, as in airy, but they are also lite, as in taste. They are not real sweet which is what I like about them. They puff up to produce an airy cookie but the problem is that you can eat about 10 of these before you realize what you've done. Really, I am not kidding. You'll see. And with some coffe or tea you are a goner.

The recipe includes:
  • 1 cup shortening
  • 1 cup sugar
  • 1 cup canned pumpkin
  • 1 egg
  • 2 cups flour
  • 1 tsp baking soda
  • 1/2 tsp salt
  • 1 tsp cinnamon
  • 1 cup raisins

Icing: powdered sugar and milk.


Preheat the oven to 375 degrees. Prepare cookie sheets with parchment paper. You don't want these cookies to brown and the parchment paper will help with this.

Sift together the flour, salt, baking soda, and cinnamon and set aside.

In a mixer beat the shortening with the sugar until light and fluffy. Add the pumpkin then the egg, mix well. Mix in the dry ingredients until just blended, add the raisins.

Drop by tablespoons on lined cookie sheet. Bake for 12 to 15 minutes. Cooking time depends on how many cookies you put on the cookie sheet at one time. The more cookies the more time. I tend to make about 12 at one time on a large sheet pan so it takes a full 15 minutes. I then remove them from the oven and allow them to cool on the sheet pan for 2 minutes before I remove them to a sheet of wax paper on the counter. These must cool completely if you are going to ice them otherwise the icing will just melt all over.

To make the icing put the powdered sugar into a small bowl. Pour in some milk very slowly and stir with a spoon to a smooth consistency. It takes very little milk for a lot of sugar.


Once you have an icing that is thick, creamy and will drip slightly, but is not too runny, you can drizzle them over the cookies. I make little zig zag patterns that look pretty. Allow them to set up.


These cookies are best if eaten soon. I usually make a double batch then pack them in clear glasen bags and tie them with ribbon to give out to friends.

A note about the shortening. I buy the Spectrum brand shortening that contains no trans fats. You know, it just seems a little bit healthier.


I hope you will make them for your family. Happy Holidays!

Friday, October 30, 2009

CSA week ???????


CSA food basket number five....or is it 6? I lost count.

Once I saw the sunflowers and the spring onions I was done! It didn't really matter what else was in the basket. I mean how gorgeous is this? It's a shame to take it apart. I just want to leave it all assembled like this and stare at it everyday. It brings a smile to my face.


We got more red peppers so I made sausage and peppers by sauteing them with some organic turkey and chicken sausage. Easy, quick and satisfying.


More basil. I have made more pesto in the last two months than I have in the past two years but gotta use it up and now that I know the citric acid secret and know I can freeze it there is no reason not to. Of course I made pasta one night with the pesto and, as always, a salad. I shaved some slices on Parmesan on the pesto pasta for a little added zing.


I used the spring onion tops to make some massive baked potatoes for dinner. Loaded them up with sour cream, the green onion tops, crumbled apple wood smoked bacon and lots of salt and pepper. It turned in to a meal.


Did I tell you about the cucumber soup? It was horrible. I've had cold cucumber soup before and I liked it but this was not good. The recipe I selected was just not right. My husband refused to eat it and I was not thrilled either so I dumped it. Another one hits the dust.


More summer squash called for a quiche. I used a frozen pit crust (shame on me! I have not done that in years!) Cut up the squash into bite sized pieces and saute in some olive oil with salt, pepper and garlic. Beat about 6 eggs with some cream or milk. Cook some apple wood smoked bacon. Chop the spring onions and shred some cheese. I had no recipe. I just layered it all in the pie crust and baked it for about 45 minutes and it came out perfect. Served it with a side green salad made with a pomegranate vinaigrette, with the lettuce from the CSA of course.


One item we got was a kohlrabi. I had never used one and had no clue what it was until I researched it. Then I had to figure out what to do with it and decided to add it to a stir fry. It's similar to the root vegetable that tastes slightly like broccoli but is very mild like a jicama. It was good.

The carrots were beautiful. Small little perfect specimens with dirt still on them. They were so cute. I was excited about making them for dinner one night but did not have enough and so mixed in a few carrots I bought at the supermarket. I cooked them all together in exactly the same way only to discover the flavor difference was unmistakable. I am sad to report that the supermarket carrots were so much better.


All the fruit has been wonderful. Peaches, nectarines, apples, grapes and plums. Really good. Oh yeah and melon too. My fav.


At this point I am more than half way through my CSA subscription. I think I only have a couple more. I have learned some things about myself along the way. One is that I support everything the CSA stands for. I am happy this has been a successful endeavor for South Coast Farms. They have a large following and when I go there on Wednesday to pick up my basket the place is busy with people excited to see what's in them that week. It seems there are lots of other folks who love this as much or more than I do. BUT, and this is a big but. I have missed having the options of what to purchase. I went to the farmers this week for the first time in months and I was in heaven. All that variety, and the beautiful tables filled with seasonal produce and I could pick and choose what I wanted. Wow I have missed that.


That being said I probably will not renew my subscription. I look forward to Saturday mornings at the farmers market. The act of walking around seeing all the foods offered, not just produce. The cheeses, eggs, coffee, baked goods. The quality of these products is high and the cost is well worth the taste and enjoyment that comes from these artisans and their products. One woman I visited makes her own goat cheese. I was given a taste of one with lavender and lemon. It was wonderful.


I am still a huge supporter of the CSA's and what they bring to the community. Perhaps if I did not cook as much or if I was so busy I did not have the time to pick and choose what I wanted it would be different. I see lots of working Moms at the CSA that don't have alot of time and so what they get in the food basket is exactly what their family will eat that week and they are thrilled to have it. I get it. But that is not my situation. Or maybe I am just too spoiled and don't want to give up the options presented here in Southern California.


So the end of my CSA experience in upon me, for now. It was great and I am thankful for having it.

Sunday, October 4, 2009

The Simple Pleasures


I am a happy girl today. It is true that some of the simple pleasures in life can bring so much joy.


I am a frequent visitor of my local library. It's big, it's beautiful, and it's full of wonderful books. It's an adult candy store. I could spend hours in there, and sometimes do. It is specifically full of books about food. Cookbooks, books written about the food of other countries, books written by people who raise and grow their own food, food writer opinions, big picture books, historical stories. You can read a book that will teach you something or you can look at the pictures. You can try the recipes or simply enjoy the stories. You can hold the book in your hands, feel the paper, smell the musk. You won't get that on a Kindle.


When I go to the library I usually stand in the cooking aisle and look at each shelf, scanning the books to see what is new or what I have missed. I always find something. I have found books this way that I would never have known existed and would have never read. Some of the best and most enjoyable have been the books I just happened upon using this method. I also have a journal where I write down books I want to check out of the library. When I read a review or reference to something that I think I might enjoy I jot it down in my book journal and take it with me to the library.


Today was one of my library days. I checked out four new books, brought them home and laid them out on the coffee table, made myself some lunch and sat down to peruse and enjoy. I get a funny little excited feeling like I have a secret. It makes me so happy. It might seem like such a small thing but then if this small thing makes me so happy then I think it should be done, and often. To do things for oneself that bring contentment and joy is something we should all practice.


Today I got:


  • Mozzarella. The pictures alone are just incredible but along with that there are recipes from some leading chefs that I plan to try. Oh boy!


  • An Omelette and a Glass of Wine by Elizabeth David. Elizabeth David was a food writer who reached acclaim the 1950's in Britain. This book was first published in American in 1985. James Beard described her as a purist and perfectionist and intolerant of mediocrity.


  • Is there a Nutmeg in the House, again by Elizabeth David. Insisting on authentic recipes and fresh ingredients she taught that food need not be complicated to be delicious.


  • A Flummery of Food, Feasts for Epicures. A funny little book of stories collected over the years about never to be forgotten meals, moderation and overindulgence, fine wines, romantic places, grand banquets, proper and improper behavior of hosts and guests, and food for fantasy. Sounds intriguing.


I can't wait to start them all. I only have three weeks so I've got to get busy. Tonight I will continue the enjoyment by reading in bed, possibly with a nice glass of wine. After all, practice makes perfect!

Tuesday, September 29, 2009

Roasted Red Pepper Crostini


Roasted red pepper crostini.


A nice evening, an appetizer and wine on the patio, ahhhhhhh. Can you feel the gentle breeze in that picture?


The red peppers can be done fresh or a day or two ahead if you are entertaining. In fact, I suggest making them a little ahead of time so that the flavors are fully incorporated. You could make them in the morning for an evening meal.

You will need:
2 tablespoons olive oil
2 red bell peppers
4 anchovy fillets
1 clove garlic minced
salt and pepper
4 slices bread


You will need to determine how much you want to serve and them decide how many peppers you are cooking. For 4 crostini I cook 2 peppers, using 1/2 a pepper for each, and this would serve two. If you are serving four use 4 peppers making 8 crostini, again 2 pieces per person. Simply double the recipe.


Start with the red pepper topping. I prefer to grill the peppers until good and charred. I think the grill gives them more flavor. If you prefer you can put them on the grate of your gas stove and simply turn them until they are charred well. Allow them to sit for a few minutes to cool so you can handle them. Peel off as much of the skin as possible but don't get too picky about it. I don't mind it in the finished product. Then slice them and set aside. Heat a saute pan with a couple tablespoons of olive oil and add the anchovy. Allow to cook slowly until the anchovy melts into the oil. Add the peppers and cook a couple minutes, then add the garlic and cook for one minute more. Turn off heat. Allow them to sit until ready to use. They should be a room temp to eat but if making ahead you can refrigerate and then bring them back to room temp for serving. I have made large batches of these for parties and for several servings over the course of a week and it works very well.


Now when it come to the bread I always use a good quality artisan bread. It makes a difference. I don't use white bread because I want it to have some nutritional value and because I like the mouth feel of a hearty bread. I buy multi grain. Slice the bread, baste it with olive oil, then toast it. You can do this in the oven or on the grill. Once off the heat immediately take a garlic clove and brush the bread which causes the garlic to kind of melt onto the bread. Sprinkle with salt and pepper and top with red pepper.


Now go out to your patio and sit down in the cool breeze and enjoy!

Tuesday, September 15, 2009

Lemoncello and Sorbet


Lemoncello. Ever had it?

It's that delicious Italian liquor from Southern Italy.

We keep it in the freezer because it is nice to sip however our favorite is a Lemoncello Martini. I have also used it in a cake recipe.


You can make lemoncello at home. It is simply lemon peel, vodka and sugar. That's it. Meyer lemons must be used so when they are in season I make a batch of lemoncello that lasts all year. I also make it for gifts. Fill a nice looking bottle and wrap some ribbon or raffia around the neck with a label and present it as a hostess gift. You can also put the lemoncello martini recipe of the label and the recipient is ready to go.

Having a bottle of lemoncello around the house over the last couple of years I decided I needed to find some new recipes. You know, don't want to get into a lemoncello rut or anything. I decided a sorbet might be nice. Escpecially for the summer months. It's light, refreshing, especially as a palate cleanser between courses for a dinner party. Of course I can just eat it for dessert alone with nothing else but I thought it might be somewhat impressive for guests.


To make lemoncello you need:

2 pounds lemons

35 ounces vodka

2 pounds sugar

35 ounces water


Peel all the skins off the lemons. Only the yellow part should be used.


I use Belvedere vodka for my lemoncello and so I saved an empty bottle to use exclusively for this purpose. Measure out 35 ounces of vodka and pour it into the bottle then stick the lemon peels into the bottle making sure they are submerged as well as possible. (I use a chop stick for this)Allow to sit in a cool place for 4 days. The vodka becomes infused with the lemon. After 4 days remove the lemon and strain the liquid to remove any bits.


Make a simple syrup by putting the water and sugar into a saucepan and heat over low heat until the sugar just dissolves. Allow to cool. Once cool put the alcohol and simple syrup back into the bottle and chill. You now have lemoncello.


I have experimented with the amount of sugar used. Some people think this is a little too sweet so you can use less sugar. Make the simple syrup and add only enough to your taste. I felt that by reducing the simple syrup it was not as good when used for martini's so I went back to the full amount.


If you want to make lemoncello sorbet you will need:

2 cups water
1 1/3 cups sugar
1/2 cup lemoncello
1 cup fresh meyer lemon juice

In a saucepan heat the water, sugar, and lemoncello stirring until dissolved. Remove and allow to cool. Add lemon juice. Chill. Put mixture into an ice cream freezer and freeze according to manufacturer directions. At this point you can hold it in the ice cream maker or put into a container and put in the freezer until ready to use.


Serving suggestions: garnish with mint leaves or lemon slice or fresh blackberries. Use a martini glass or some other pretty stemmed glass. It makes a pretty presentation.

Thursday, September 10, 2009

CSA Food Basket - week two


Yikes more produce!

I picked up my CSA food basket yesterday and that means more good healthy food. I immediately set about cleaning the stuff and getting it put away. In the process I realized I still had a few things left from the last basket, and that was two weeks ago. Shame on me! We have eaten lots of vegies in the last two weeks so we don't feel like we are slackin' but seriously, using some of this stuff is like what the????

For instance I still had a bunch of celery and with yesterday's delivery I got another bunch. What does a person do with that much celery? I used one stalk in some tuna salad. Now what? I got on google for celery recipes and it was astonishing what came up. Tons of recipes and they all sounded disgusting, in addition to the fact that they used like one celery stalk. Hello. That is not much help. So here is what I am thinking. Cream of celery soup. That should use up a far amount don't you think?

Well yes and no. I made a puree of celery soup because I was trying not to use cream. The recipe used an entire bunch of celery, which was good, but the dish left something to be desired so we had one bowl and threw the rest of it out.

I made halibut wrapped in parchment and I added several stalks of celery to it thinking we would use up several stalks that way. Unfortunately the celery did not cook all the way through and it was a little too hard for me. I didn't want to cook it any longer because then the fish would have been overcooked. Other than the celery the dish was good.

These beautiful yellow starburst squash were put on the grill which is still our favorite way to cook vegetables during the summer. A little olive oil and salt and pepper. Simple.


Here is the list of what we received in the CSA food basket for week two: green beans, broccoli, lacto kale, 1 bunch basil, 1 bunch parsley, 6 heads lettuce, 1 bunch pink radishes, 4 cucumbers, 2 lemon cucumbers, 6 red bell peppers, 1 bunch celery, 6 potatoes, 1 onion, 1 grapefruit, 4 oranges, 4 plums, 2 nectarines, 1 melon and 14 small tomatoes. Quite a lot of stuff if you ask me.

I was surprised to get potatoes and so decided to make something special with them. After looking at lots of recipes I ended up making twice stuffed potatoes with bacon and cheese. So much for the healthy streak I was on. Guess I could have used that cream in the celery soup uh?

Now I hate to get on the cucumber issue again but, as I stated last week, my husband dislikes them and now I have four more I have to use. This is a major challenge. Maybe more of a challenge then I really want. If I am going to be rich in vegies couldn't it was least be something we like so we could just get sick of eating it? However, when you don't even like them it is hard to figure out how to use them. Oh well. Would my neighbors think it strange if I shared my cucumbers with them? I take them cookies and baked goods all the time, why not a nice cucumber salad?

Monday, August 31, 2009

Making Ricotta Cheese


Yes I said making ricotta cheese.


I'm on a cheese kick. Gotta do it. It's new, its exciting, and full of surprises. It makes me giddy to think about making my own cheese.

I don't know how I actually got on this kick. It has interested me for some time. I would walk into cheese shops and think about making cheese and how satisfying it must be. But it is so easy drive to a store and buy good cheese that the thought of making it might seem a little stupid. Eventually the bug got the better of me and I just had to give it a try. I bought a home cheese making book and sat down and read it cover to cover which only proved to get me even more excited about the prospect of eating cheese that I would make.
In my very short cheese making career here is what I have learned so far. It's a simple act of taking milk and heating it that produces cheese. Seems simple. It is simple in concept. Au contraire. Cheese making is not easy. It is a complicated chemical process, and one misstep can ruin a batch of cheese. You end up with something else entirely, and sometimes it is hard to tell what it is.

But this cheese making event was a success so lets get to the details.


Ingredients and equipment:
  • 1 gallon whole milk
  • 4 cups cultured buttermilk
  • Salt
  • Large heavy bottomed stock pot
  • Thermometer
  • Butter muslin or cheesecloth
Put the milk in a large heavy pot and heat it slowly until it reaches 180 degrees, stirring occasionally. This will probably take 35 to 40 minutes, but the temperature is the important item here. Once it has reached 180 remove the pot from the heat and let it sit for 30 minutes. This will allow the curbs to form, see below. Do not stir at this point.


Line a colander with a double layer of butter muslin. Pour the curds into the colander carefully and allow to drain for anywhere from 30 minutes to 2 hours. The longer it drains and dryer the cheese will be. You decide. It all depends on how wet or dry you want it.


When the ricotta has drained to your satisfaction transfer it to a bowl, break it up, and stir. Add salt to taste. The cheese can be kept in the refrigerator up to on week but I would recommend using it as soon as possible.


There are number of different ways to serve and enjoy this cheese. You can add a variety of fresh chopped herbs to it then serve it on crackers. You could add some sun dried tomatoes. I like to make crostini, put the goat cheese on top, then top with some of the sun dried tomatoes and olive oil. Or you can make lasagna or add it to an omelet.


One thing is for sure. The taste is so much better than stuff you buy in the containers at the supermarket. Now I know that making cheese is not such a stupid idea.

Sunday, August 16, 2009

CSA Food Basket - week one


This week I drove down to the farm and picked up my first food basket, as they call them. Holy moly! The thing was so heavy I could barely lift it into my car. It smelled wonderful....like dirt and like being on the farm. I wanted to just sit in my car for hours and get high off the fumes. And my dog Pepper was diggin' it too.
I made a point of unpacking it item by item onto my kitchen counter. I looked at each piece, smelled it, thought about what I could do with it, and examined it like it was some kind of jewel. I was in awe. You will be surprised how much stuff I got. Here is the list:

1 bunch celery

4 heads lettuce

1 bunch swiss chard

1 bunch lacto kale

1 bunch parsley

3 heads broccoli

2 summer squash

3 pickling cucumbers

4 regular cucumbers

1 bunch carrots

4 oranges

1 grapefruit

4 plums

3 red bell peppers

3 yellow starburst squash

1 melon

3 large tomatoes

9 roma tomatoes

I knew it was going to be generous but, seriously, I had no idea there would be that much stuff. After I got over how beautiful it all was I set about putting it away. Most I could leave out on the counter as long as I used them fairly soon but I did have to wash the lettuces right away and get them bagged and into the frig to chill. I admit I have not done that in awhile. I have been lazy and buying lettuce in a bag. But now I actually had to wash the dirt off of it, spin it dry and store it somehow. Heck this is work.

The key is to plan what you need to eat first. The lettuces and kale would get used first because the carrots and squash could spend a few days in the refrig. And I knew we would eat the fruit for breakfast or lunch so that was not a problem.

Now what is interesting is that my husband does not eat cucumbers, he says they don't agree with him. Did I say we received four of them? What the heck am I supposed to do with them? The folks at South Coast Farms sent me a recipe that I decided to try. You slice the cuc's, salt them and let them sit for 15 to 30 minutes, wash and dry them, then mix together vinegar and sugar and marinate them in that for awhile. I was astounded at how good it was. Seems terribly simple to be so good. And my husband liked them! Wahoo. With the rest of them I made a salad with cuc's, garbanzo beans, tomatoes and some Italian dressing. Then I will make a gazpacho and we should be done with them.

And I have 3 pickling cucumbers. What does one do with only three of these? Am I supposed to make some pickling brine just for the three? I think out of everything in the batch these will be the most challenging.

The chard and kale I sauteed in olive oil with some garlic, a small pinch of red pepper flakes, and some salt. I topped that with white beans and diced tomatoes and drizzled it all with olive oil. We were feeling quite healthy.

The green summer squash I used one night in a big salad. I cooked it quickly in a grill pan with olive oil, garlic, salt and pepper. I also used one head of the broccoli, some of the tomatoes and the carrots in addition to a piece of salmon and made a big tasty salad as an entree for dinner.


The broccoli was a challenge for me. I am not a fan broccoli but my husband is. He was so happy it was in the house but I was trying to figure out what I could do with it to reduce that bitter broccoli taste. I had three heads. The first one I simply streamed and hit it with some salt and Al ate it all up. I had a couple bites and thought oh yeah this is as bad as I remember it. So the next time I made a pasta dish. I blanched the broccoli and set it aside. In a large saucepan I added some olive oil, garlic, and pinch of red pepper flakes. Let that saute for only a few seconds then get the broccoli in and the pasta and start tossing. Add a little pasta water or stock to make a bit of a sauce. Serve it in big pasta bowls with a grating of Parmesan. Now this broccoli I could eat.


The third head I pickled. Haven't tasted it yet. I have been reading some food blogs about pickling and was getting kinda curious about it all so what the hell....lets pickle some broccoli. I will taste in a couple of weeks and let you know how it is.


The red bell peppers where a bit disappointing. They had a bitter taste. I made pasta in peppers, sauteing the peppers in olive oil and butter with some garlic, then adding some heavy cream and simmering for a few minutes to turn into a thick rich sauce. Lots of fresh basil over the top with some cheese. I have made this dish numerous times throughout the years and it is always satisfying. But this time it had a slight bitter taste of the peppers. I was not real happy with them. The peppers have to be sweet.


The yellow squash in going on the grill tonight with the beautiful organic roast chicken my husband has on the rotisserie. We have owned that grill for years now and have never used the rotisserie. Did it take getting all this produce to make us finally use the thing? Whatever it was we are like excited children at the prospect.

Monday, August 10, 2009

CSA - My new love


I am in love. Ah isn't that sweet? I've been waiting and searching and now it has happened. A beautiful CSA right in my own back yard. I am thrilled and filled with anticipation.

I recently found an organic farm in Orange County that not only grows organically, operates a produce stand, but also has a CSA, which stands for Community Sponsored Agriculture. I have always been curious about the CSA's and wondered what it would be like to be lucky enough to join one. The entire concept is rewarding but living in the city usually limits access to things like this. Getting some organic growers at the farmers market took years and I was thrilled with just that.

The key points about this CSA are that the food is locally grown. The food I will get in my basket is picked in the morning and I pick it up in the afternoon. You can't get much fresher than that. The taste is what food should taste like. A tomato tastes like a tomato not one of those cardboard tasteless things sold in the supermarkets. They practice sustainable agriculture that means they do not ruin the soil, there is no pesticide run off, and they rotate crops to keep the soil healthy for years to come. They provide nutritious food which means not putting pesticides into your body. And when you buy from them you support a local business and the money goes right back into the farm.

The CSA I joined is bi-weekly and I joined for a quarter which will provide us with a basket of fresh produce for the next 3 months. The amount of food in a regular size basket is quite large. They also offer a large basket but with just the two of us we would not be able to use the larger basket. Its' alot of food! Another advantage is that the cost of the basket is far less than I would spend if I went out and bought all the same items at the farmers market. Not only will we be eating better it will be less expensive. Gotta love that.

I can't wait to get my basket and see what's in it. I know there will be things in it that I may not be very familiar with and that fills me with anticipation. I want to learn how to eat some produce I may not have had before or that I have to figure out how to cook. I want to expand my food world.

The farm I found is: http://www.southcoastfarms.com/. You can log on and read about their business and what they have to offer. I found them via Chef Rich at Sage Restaurant, which we frequent. He still goes to the farmers market for ingredients for his kitchen and prides himself on finding small organic growers. That may be partly who he food tastes so good, besides the fact that he is a talented chef.


The picture is from the farm stand and all those tomatoes are organic heirlooms. Each variety has it's own unique flavor. I bought quite a few but within days they were gone. Can't wait to go back and get more.

I will blog about my experiences with the CSA which I am sure will be fun and interesting and I hope you will enjoy the ride with me.

Wednesday, August 5, 2009

Pesto Pasta Salad


Pesto Pasta Salad. Who does not love pesto?

The great thing about making pesto is that you can use different herbs, cheese and nuts to achieve a totally different taste. This recipe is different because it uses mayonnaise which adds a creaminess to the pesto you will never get otherwise. It may sound strange but every person who has ever tasted this salad thinks it is better than other pesto's they have had. Honest.

This recipe is for my sister Terri. I won't go into the details but suffice it to say that I fell short when asked for a pasta salad recipe.


This recipe is made with spinach and basil both of which I love. The spinach helps give it that bright green color and makes it healthy and the basil is traditional in pesto and gives it that familiar flavor. Be sure to always toast your nuts, it brings out the flavor and adds to the finished dish.


The recipe:
  • 3/4 pine nuts, toasted
  • 2 medium garlic cloves
  • 3 cups baby spinach leaves, about 4 ounces
  • 1 cup basil, about 1 ounce
  • 1/2 tsp ground black pepper
  • 2 tablespoons fresh lemon juice
  • 1/4 cup extra virgin olive oil
  • 6 tablespoons mayonnaise
  • 3/4 cup Parmesan cheese
  • 1 pint cherry or grape tomatoes, cut in half
  • 1 pound Farfalle (bow tie pasta)

Toast the pine nuts in a skillet over medium heat tossing every few seconds to prevent burning. This only takes a couple of minutes. Pine nuts burn easily so as soon as they get some brown on them turn the heat off. Set aside to cool.


To make the pesto put everything in the food processor: the garlic, spinach, basil, pepper, lemon, olive oil and 1/2 cup of the pine nuts and process just until smooth. Add the cheese and mayonnaise and pulse until just blended.


Cook the pasta in a large pot of boiling well salted water according to package directions. Allow to cool slightly.


To make the salad put the remainder of the pine nuts into a large bowl, add the pesto, the pasta, the tomatoes and toss well. Chill.


Warning. This recipe makes more pesto than you will probably need. I recommend you start off using about 2/3 of the pesto in your salad. I find that is enough. I take the remaining and keep it for another use.

I made this last weekend for a family reunion. The funny thing is that we had tables and tables full of food and three of my sister-in-laws knew immediately that I had made this salad.

Want to know a secret? If you really want to keep the green color fresh add a pinch of citric acid. It works beautifully. It will keep the leftover pesto bright green for days in your refrigerator. I know most people don't have citric acid but I now have it in my house because it is used for making cheese, and you all know about my obsession with cheese making right?


So Terri I hope you make this and everyone loves it!

Tuesday, August 4, 2009

Onions with Balsamic Glaze


Cipolle al Aceto - Onions with Balsamic Glaze


I was at the farmers market last weekend and found these Cipolle onions. I rarely buy them but decided I needed to expand my food world. Sometimes you just need to try something new. You can't eat the same thing week after week. So I bought a bag full and then proceeded to figure out what to do with them.


Cooking them in a balsamic glaze proved to be a winner. They are so flavorful. Serve them as part of an antipasto or on a salad. I went to an outdoor movie night and brought them as part of our picnic. They were a big hit!


The recipe:
  • 1/4 cup olive oil
  • 3 Tablespoons unsalted butter
  • 2 pounds onions, cut in half and peeled
  • 2 Tablespoons sugar
  • 1 cup balsamic vinegar
  • 1 cup water
  • 1 teaspoon fresh rosemary, chopped
You can use large Spanish onions or red onions and cut them in half. Because I used the small Cipolle I left them whole.


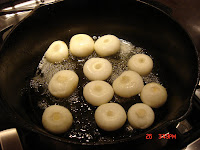
Heat the olive oil in a heavy saute pan, I used my old cast iron skillet, then add the butter and cook until the foam subsides. Add the peeled onions cut side down and saute until light golden brown, 8 to 10 minutes.


Add the sugar, vinegar, water and rosemary and bring to a boil, stirring occasionally. Keep on eye on them so the sauce does not reduce too quickly and burn. Cook the onions, uncovered, until the onion are tender and the liquid has reduced to a glaze. This might take about 20 minutes. If the liquid cooks off too quickly add a little more water. You want the onions to be done all the way through and the liquid to be a glaze consistency but not burn.


You can serve these right away but I like to put them in a jar and refrigerate them for a few days. I think they taste richer and deeper after sitting a few days. If refrigerated take them out and allow to come to room temp before serving.


Friday, July 31, 2009

Tomato Sandwiches


One of life's very simple pleasures.


If you have any of the anchovy mayo left over from the BLT's make some tomato sandwiches. If not just use a really good mayo. These are one of the simplest pleasures of life......bread, mayo and tomatoes. A little sea salt and fresh cracked pepper. You could drizzle a little olive oil on top as well.

I had never had one until a couple of years ago and now I realize I missed out on years of satisfaction by waiting so long. I had a hard time believing they could be so good but I quickly realized the errors of my ways. During tomato season I live for locally grown just off the vine tomatoes. The taste cannot be beat. Simple, easy and so delicious. What more can you ask for?

Get yourself some good heirloom tomatoes and make a tomato sandwich for breakfast or lunch. Be sure to either stand over the sink or keep your plate under your chin cause it will be juicy. And you'll need a big ol' napkin.

You will not be sorry.

Wednesday, July 29, 2009

Peach Jam


PEACH JAM


Peach Jam is such a treat during the summer months. Go to the farmers market and find the best peaches you can. When they are at their best it is time bring them home in a big basket and prepare them for cooking. They will never be as good as at this moment.


I had fond memories of my Grandmother making plum jam for us every season. We loved it. We ate a ton of peanut butter and plum jam sandwiches through the years. And whenever we had biscuits for dinner, guess what......plum jam was always on the table. In a cute little glass bowl with a silver spoon. I don't think I can recreate Grandmothers plum jam so I thought I would try making peach.

This is a very simple process. Even simpler if you just eat it soon and don't bother canning it. But if you want it to hold up for later in the year you will have to can it. Can you imagine in the middle of winter you can open a jar and taste the fresh summer taste of those peaches?

I use 4 peaches for this recipe and it makes two small jars of jam. Peel the peaches and cut up into a saucepan catching all the juice in the pan. Add 1/4 to 1/2 cup of sugar. This will depend on how sweet the fruit is and how sweet you like your jam. I don't like mine too sweet so I use as little sugar as possible. Then add 1/2 a diced green apple (skin removed) and a pinch of cinnamon. Allow to cook about 20 minutes stirring every few minutes and keeping a close eye on it. You want the fruit to be soft and the apple to cook into the peaches and the sauce to start to thicken. Add 2 tablespoons Grand Mariner and cook another 10 minutes. It should not be too watery, if it is cook a few minutes longer.

If you do not want to make this for yourself I will do it for you. I am currently making large batches of this jam and canning them. I sell them for $6.95.

Simply email me for your jar of fresh Peach Jam.

Monday, July 20, 2009

Green Bean Salad


Fresh green bean salad.

Green beans. I love them. They are probably one of my favorite vegetables.

During the summer I am always making things like cold salads to minimize turning on the stove and heating up the kitchen. This recipe requires a quick blanch in boiling water but it is quick.

Ingredients:

  • Fresh Green beans, ends removed and cut into bite size pieces
  • Shallots, minced
  • Dijon Mustard
  • Mirin
  • Olive Oil
  • Salt
  • Fresh Tarragon

This recipe involves the traditional blanching and shocking method. It means that you cook the veggie in bowling water just to blanch it. The veggie should be slightly cooked, but still retain some crunch, they should not be mushy. Once they are blanched you put them into an ice bath with stops the cooking process and also helps to retain that beautiful color.

Get a big pot of water on to boil, add some salt. Clean the green beans, take off the stem end, then cut them into even bite size pieces. Get a bowl ready with cold water and some ice cubes thrown in to get it really cold for shocking. Blanch the beans in the boiling water for 3 minutes. Remove quickly and shock in a bowl of cold water. This will only take a minute. Remove from the water and pat dry.

Make a vinaigrette by putting everything into a bowl and then whisking together. Add the beans and toss. Put it into a container and store in the refrig.

I love the flavor of fresh tarragon so use it when you can. It is not always available so use dried it need be. When using fresh herbs I always use more than I would if I use dried.

This is a good dish for a picnic.

Watermelon Martini's

Watermelon Martini's.


Refreshing. Summertime in a glass.

Having food left in the house that needs to be used always inspires me. I hate to through food away and sometimes I buy things with the best of intention but don't seem to use it up. It's those times that I get creative and try to figure out what to do with it. Such is the case with the watermelon I recently bought. It was bigger than I thought and I can only eat so much watermelon ya know what I mean? At the end of a few days I thought ah oh what do I do with the rest of this thing?

Start by cutting the watermelon into small chunks. I had about 5 or 6 cups of cut up watermelon. Put it in a blender and puree it until smooth. Then ran it through a mess strainer. This gets all the pulp out and makes for a smoother cocktail.

Make some simple syrup by using equal parts water and sugar, in this case 1/2 cup of each. Heat in a small saucepan until sugar is dissolved and simmer for approximately 3 minutes to get thick and syrupy. Allow to cool completely.


Add the simple syrup to the watermelon puree and chill well.

Chill the martini glasses by filling with ice cubes and allow to sit while making the tini.


For one martini combine in a martini shaker:
  • 1 shot vodka
  • 1/2 shot melon liqueur
  • 1/2 shot fresh lemon juice
  • 2 shots watermelon juice
  • shaved ice

Shake well and pour into chilled martini glasses. Summer in a glass.

Friday, July 17, 2009

Food News


I am constantly reading articles about food. They fascinate me. What is OK to eat what is not? What does our food supply do for us? Or how it can make us sick. I recently found some good information from the Environmental Working Group web site that I would like to share.

The site offers a list of the produce we should buy organic and what is OK to purchase through conventional growing methods. The organic list is referred to as the dirty dozen. Love that. At the top of the list are peaches. I have been buying peaches once a week for the past few weeks. I love love love peaches. And now I feel a sense of great relief.... that I bought only organic peaches considering they are number one on the dirty dozen list. Whew!

The web site has a cut out list that you can print and carry on you for easy reference. Its called the Shoppers Guide to Pesticides and it lists the dirty dozen and the top clean 15, which are the top 15 items that are considered tolerable to buy non organic, or that are on the lower part of the list for pesticide load. They also have a PDF file that lists many more items which is handy for the kitchen and a program for all you iPhone users so you can download it to your iPhone.
The web site is: http://www.foodnews.org/. I hope you take a look and find something helpful to you and your family.

Wednesday, July 8, 2009

Goat cheees and tomato tarts


GOAT CHEESE AND TOMATO TARTS.


Looking for another use for that homemade goat cheese? How about a tart. All fluffy and golden in puff pastry. Buttery crust, goat cheese center and the tomato on top that roasts when in the oven. It's all goodness.


In one of previous posts I wrote about making the goat cheese which in itself was pretty special. But then you gotta figure out what to do with the stuff when you get tired of eating it on crackers. Who does that? Gets tired of eating it on crackers I mean. Anyway... I decided to give the tart a try. I love the summer tomatoes and anything in puff pastry is a winner in my book. I gotta say.....another really really really good tasting dish. For this recipe I took the plain goat cheese and added some chopped herbs to it. Any herbs that you like would work.

I made the tarts large and served them with a salad for dinner. We love eating this way. We opened a bottle of wine to go with it and the result was two happy campers. Now I admit the puff pastry is rather high calarie but the total meal itself was light so we had room for dessert. Yea! My favorite.


Here is the basic recipe. Again....the exact amounts are approximate. You can play around with this somewhat. One sheet of puff pasty makes two large tarts. If you want to use the entire package of pastry, two sheets, that would make four tarts so simply double the recipe.


  • 1 sheet puff pastry, defrosted
  • 1 tablespoon olive oil for onion, plus a little more to drizzle
  • 1 tablespoon of butter
  • 2 cups onions, sliced
  • 1 tsp thyme
  • 2 small garlic cloves, minced
  • 2 ounces herb goat cheese
  • 1 large tomato sliced into 4 slices
  • parmesan cheese
  • salt and pepper

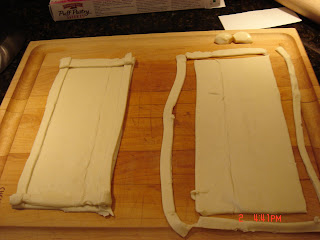
Defrost the puff pastry but keep in the refrig nicely chilled until ready to use. To make the tart shells cut the sheet in half then work with each half sheet to make two large tarts. From the half sheet cut a thin sprip all the way around. The thin strip then gets put on top on the base. This creates an edge and when the pastry bakes it puffs up. It allows your filling to stay in the shell and it adds a little crunch around the edges. The pastry sheets should be placed on a parchment lined baking sheet. You can assemble them right on the baking sheet. If you don't use the pastry right away put it back in the frig to keep chilled.

In a medium saute pan add 1 tbsp of both olive oil and butter, the onions and thyme. Saute the onions until carmelized approximately 20 minutes being careful not to allow the butter to burn. Add the garlic and cook just until softened. Season with salt and pepper. Set aside for assembly.


The general idea is that you are building layers for the tart. Start with the puff pastry shell. Prepare as above. Add the goat cheese evenly on the bottom. Top each with 2 slices of tomato. Drizzle with small amount of olive oil. Top with grated parmesan cheese.

I can't end this without giving you an out. If you don't make the goat cheese I suppose it would be ok to use store bought. But don't tell anyone.


Aren't the pictures pretty?

Sunday, July 5, 2009

Anchovy Mayo and BLT's


BLT's anyone?

Bacon, Lettuce, Tomato sandwiches....with anchovy mayo? Oh yeah baby!

It's salty with a rather strong taste so be ready for it. My husband was eating it from a spoon and his eyes rolled back in his head. From that I would guess he liked it uh?


Now I know oodles of people say they don't like anchovy. However my experience has been that it is the way it is served or the idea of those little salty fishies sitting your plate that gives people pause. Did I ever tell you about the time I fooled some of my closet friends with an appetizer that contained anchovy and they didn't know it? They raved about the roasted red peppers and scarfed it all down all the while singing my praises. I did not tell them until afterward that it had anchovy in it. They all sat there kinda looking around like she's kidding right? This is a cruel trick. Nope. The anchovies were heated into the sauce so you never actually saw them. They just added flavor. These friends are now converts to the whole anchovy controversy.


So on to the BLT's. Get all the fixins ready. I bought some Neiman Ranch applewood smoked bacon from Trader Joe's and went to the farmers market and bought some heirloom tomatoes. Then made the mayo in the morning and let it sit in the refrig until later that night to use. I have to say, however, that if you make the mayo a day or two before hand the flavors are even better. You know....all that marrying of flavors stuff.

We like our BLT's with bread that is slightly toasted and I use whole wheat cause I just have to. I can't buy white bread anymore. It makes me feel healthier.


Making the mayo is simple. You put all the ingredients into a food processor or blender and let 'er rip. Depending on what you like you can alter the ingredients somewhat. My husband loves anchovy so I added quite a few but you could reduce that amount by about half and still have a very tasty mayo with more of a subtle flavor.


The ingredients for the mayo:

  • 1 cup mayonnaise
  • 1/4 cup shredded Parmesan
  • 2 tablespoons fresh lemon juice
  • 1 tablespoon Dijon mustard
  • 2 med garlic cloves
  • 5 drained canned anchovy fillet
  • 1/2 tsp freshly cracked pepper
  • 1/2 tsp Worcestershire sauceBulleted List


Put all the ingredients into a food processor and blend until smooth. Refrigerate until ready to use.

Give it a try. And once you have think about this. How about some grilled tuna with that mayo? And my personal favorite tomato sandwiches. Fantastic!

Tuesday, June 30, 2009

Making Goat Cheese


Goat Cheese.

I have a fascination with cheese. I can spend enormous chucks of time thinking about it. Then I hit a wall and leave it alone for awhile.
I think it all stems from my dream......to own a cheese shop. To work there every day handing out samples of cheese to customers....having my customers get big smiles on their face when they taste something they have never tried before....but they know they want again. I want to chat with them about where the cheese came from, how to serve it, how to use it in a recipe, how to store it. I want them to leave not only with cheese but with a fond memory of our conversation. I want them to remember the place and the people and I want them to come back again for more.
Where do all these cheeses come from? How is it possible to take the same milk and rennet and come up so many different types of cheese? I am fascinated by this. I want to learn everything there is about it.
To that end I have started the only way I know how and that is to make cheese. Really simple cheese. So far I have made ricotta, goat cheese, and mozzarella. They were all three delicious. With the ricotta I made an acorn squash lasagna, with the goat cheese a caramelized onion and goat cheese pizza, and with the mozzarella we sliced it with organic heirloom tomatoes, fresh picked basil directly from the garden, drizzled a little olive oil over the top and hit it with some sea salt and pepper and ate it straight away.
I have spent some time researching this cheese making topic and found that it is much more difficult then one might think.
In my childhood I recall my mother coming home from the supermarket with Velvetta cheese and we would make grilled cheese sandwiches. We had no idea this was not real cheese. And it melts beautifully. Have you read the package on that stuff lately? Yikes!
So on to what this post is about: I decided to be brave and make goat cheese. I love goat cheese. I buy it quite often and love it on salads and for crostini with various toppings. So I put it on my calendar and decided to just do it. (Putting tasks on my calendar somehow tends to make me do it. I know! I know!) I found a recipe that I liked and my first challenge was to find the goats milk. Pasteurization in milk can effect the cheese making success so I wanted to find unpasteurized or raw milk. However, that proved to be more difficult than I thought. Hum....who would have thunk that living in the big city would limit the prospect of getting raw milk? Now if I lived out in the country where I had access to a farm I could go buy some wonderful fresh milk and make some fantastic cheese. Here in Orange County we have Mothers or Whole Foods Markets. There are a couple of dairy's but they carry basically the same thing and none of them carry unpasteurized products. Its a safety thing....which is a whole other topic!

There are a few recipes out there which you can find in cheese making books for by googling the topic. Look in the cookbooks you already own. Some recipes work better than others and lend a slightly different taste. What I am amazed at it that often the same ingredients are used but somehow we end up with different cheese. It is very subtle. A slightly different technique or the difference in time and temperatures all produce a different result. Some folks say making cheese is easy but I don't know if I agree. Some folks say making wine is easy too but I think we all know that is not true.

I found a recipe that I liked and so off to Mothers Market I went to get the milk. I purchased the best quality pasteurized organic goats milk they had. Do NOT buy ultra-pasteurized. That is the key. I had my doubts as to whether the pasteurized would work or not but it did and it was a breeze.


Basically you put stuff in a pot, wait for it to get to a certain temperature, then strain it. The recipe takes two days and most of that time is waiting.

Ingredients:

2 quarts organic goats milk
2 cups buttermilk
1/2 tsp liquid rennet
Salt

This makes about 3/4 pound. You can easily double the recipe for 1 1/2 pounds.


In a large non reactive saucepan or pot combine the goats milk, buttermilk and rennet. Stir just until combined and then do not touch it. Do nothing. Heat over low heat until the temperature reaches 180 degrees F. Be sure to use very low heat so the milk does not burn. Getting the temperature up to this point on low heat does take some time, so just stand there and watch it. But don't leave the area! Watch the temp carefully and once it reaches 180 turn it off immediately.

Transfer the liquid to a non reactive bowl and allow to sit and cool for a few minutes then cover with plastic wrap. Now it sits until the curds and whey separate, overnight, see photo. The next day line a colander with cheese cloth and ladle the curds into the colander. Discard the whey. Fold the cheesecloth over top of curbs and allow to drain overnight. Put the colander inside another bowl to catch any liquid. Refrigerate overnight. You now have goat cheese. Add some salt and give it a taste. I bet it's good!


Ingredients you can add to the goat cheese to create the taste you like: olive oil, salt, pepper, herbs, sun dried tomatoes or pesto. These are all excellent in goat cheese. I used some of mine to make a goat cheese and caramelized onion pizza. How good does that look?

Tuesday, June 23, 2009

Blueberry Tarts


Blueberry Tarts
One recipe - two dishes! How can you not love that?
I had filling left from the cheese danish I made. (see previous post) I had just bought a lovely basket of blueberries and I had a sheet of puff pastry in the freezer. The mock blueberry tart was born. I love when this happens.
I've gotten pretty good about looking around my kitchen and making something with whatever is on hand. In this instance it come in very handy because I was having a dinner guest and the creme brullee I had made did not turn out. I made the tarts at the same time I made the creme brulee only because it would provide something for later and cooking multiple dishes at one time saves so much time. One cooking session, one mess to clean up but two dishes to enjoy. Good thing I did this. I was able to heat the tarts and serve them with vanilla ice cream. My dinner guest loved them and so did we. So of course I made them again the next week just to test the ingredients and to confirm how easy they were to make. They are indeed very easy to make and they taste so darn good for a quickie recipe. This recipe is perfect for people who want tasty homemade desserts but don't want to spend hours in the kitchen.
Set four ramekins on a baking sheet. Take a sheet of the puff pastry and cut it into four squares. Put one square into each ramekin. Fill with one large tablespoon of the cheese filling, see previous post for cheese danish recipe. Add a handful of fresh blueberries. Sprinkle with some torbinado sugar. Fold the corners into the center. Brush with egg white. Bake for 12 minutes, rotate pan and bake for 12 more minutes.
My favorite way to serve this is warm with a scoop of vanilla ice cream. You can remove them from the ramekins and plate them so that when the ice cream starts melting it has a place to land. Other than your mouth that is.

Wednesday, June 17, 2009

Cheese Danish


Cheese Danish. Yum!

On Sunday mornings I make French press coffee. My husband looks forward to it every week. I usually get up before him, putter around in the kitchen, then bring him a cup in bed. When he hears me next to his bed he gets a big smile on his face. Ahhhh.....the coffee has arrived. It's one thing I do to spoil him because he gets such a kick out of it.


We have had this June gloom weather the past few weeks so last Sunday I decided I needed to make something special to go with the gloomy weather. I made these cheese danish and boy am I happy I did. Not only were they really easy but they were delicious. And it turns out, they are my husbands favorite danish. (I knew that!)


You can make these for your family next Sunday. I am giving you a recipe for a very small batch, it makes 4. Which is plenty for us two, we had one on Sunday and then again on Monday with our coffee. But if you want to make more just double it. That will give you eight. I cheated and used frozen puff pastry because making danish from scratch is a long and time consuming process. Better left for another day. The danish need to be eaten pretty quickly, they will not hang around the house for days on end, because the puff pastry gets stale.


The recipe: (makes 4)

  • 4 ounces of cream cheese
  • 2 tablespoons sugar
  • 1 egg yolk
  • 2 tablespoons ricotta cheese
  • 1 tsp vanilla
  • pinch of salt
  • 1 tablespoon lemon zest
  • 1 sheet puff pastry, thawed and ready to use
  • 1 egg white (for egg wash)

Preheat the oven to 400 degrees. Line baking sheet with parchment paper.


In an electric mixer place cream cheese and sugar and blend until smooth. Add sugar, then the egg yolks and mix well. Add the ricotta, vanilla, salt and lemon zest and mix only until incorporated.


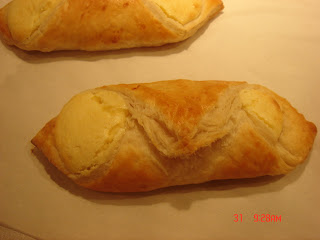
Lay the puff pastry sheet out and cut into four sections. Place the four pieces on the parchment lined baking sheet. Place a heaping tablespoon of the filling on each puff pastry piece then fold 2 edges towards the center to slightly overlap. See photo. Brush the edges with egg white to hold together. Brush the entire surface with the egg white to get a nice golden brown finish.
Bake for 10 minutes then rotate the pan and bake another 10 minutes. The result be a light flaky dough and a creamy cheesy lemony center.
If you want to get fancy you can add fruit. Strawberries or blueberries would be great.
I hope you spoil someone in your family with these. Even if it is only you.