Friday, December 27, 2013

Pasta with Salmon and Peas


This pasta came out of one of those nights when I was searching the kitchen for something to cook so I would not have to go to the store. You know how that goes, we've all had them. I would have eaten just about anything because I was in my pj's and was NOT going to get dressed no matter what. 

I found a really sad piece of salmon in the freezer, along with some peas, and a box of gluten free pasta in the pantry.  I figured I could make something happen with that. I mean if you have pasta in the house you have a meal. 

The surprising thing is that it turned out so good my husband kept asking me if I wrote down the recipe.  Of course I had not, but figured I better do so right away before I forget what I did. Now it is one of our favorite quick night meals. 

Ingredients: 
Shallots 
Stock 
Butter
Cream 
Salt and Pepper 
Peas 
Salmon 
Cheese 
Pasta (use regular or gluten free)

Cook the salmon in a saute pan for a couple minutes per side, then set aside to cool. Break up into bite size pieces. 

Cook the pasta while you are making the sauce. 

In the same saute pan you cooked the salmon in cook the minced shallots, then add some chicken or vegetable stock, reduce slightly, add some butter and cream and continue to cook for a few minutes. Add the peas and cook until just heated through. Season with salt and pepper, add the salmon. Add the pasta to the pan and toss gently.  Add some cheese and serve.    

Saturday, November 30, 2013

Stuffed Artichokes


After making these I don't know that I will ever make artichokes any other way again.  I loved these.  Even if I don't use the same filling, cooking them this way makes it much easier and faster.  I usually cook the whole artichoke in a pot of boiling water and it takes forever.  Figuring out when they are done is also difficult so I tend to overcook them and then they fall apart. Cooking them this way allows you to tell very easily when they are done. 

Ingredients: 

Salt 
2 large artichokes 
1 large lemon 
2 tbsp butter
3 tbsp olive oil 
3 cloves garlic, minced 
2 tbsp anchovy paste 
1/2 cup black olives, pitted and coarsely chopped
2 tbsp capers, drained and chopped
1/4 to 1/2 cup freshly grated Parmesan cheese


Bring a large pot of salted water to the boil.

Cut the lemon in half. Cut the artichokes in half lengthwise and using a paring knife remove the chokes.  Trim the ends of the leaves with scissors to remove the spikes. Rub the cut sides with lemon.  Add the lemon juice and the lemons to the pot of water, add the artichokes. Cover and cook for 15 to 20 minutes until the artichokes are tender. You can test for this by using the tip of the paring knife. Allow to drain completely in a colander. 

In a heavy skillet heat the butter and olive oil. Add the garlic and anchovy paste and stir, then add the artichokes face down.  Cook for 5 to 6 minutes to get a slight brown on them.  Turn over and cook another 4 minutes. 

Preheat the broiler. 

Arrange artichokes cut side up in the skillet and fill.  

To make the filling: in a small bowl mix together the black olives, capers, breadcrumbs and cheese. 

Cook under the broiler only a couple minutes to get a nice brown crust on them. Serve immediately. 

I make my own breadcrumbs.  I always keep good quality multigrain bread in my freezer. I remove a couple of pieces and allow them to defrost. Then I remove the crust, cut them up into small pieces and put them in the food processor and pulse until I get the desired crumb. 

Friday, November 22, 2013

Fall Salad with Escarole, Apples and Blue Cheese


When the weather changes and we all want comfort food it's nice to know that we can still have a salad, only one that now incorporates the flavors of Fall. I recently made this salad for a dinner party and I was quite happy with it. 

It's made with Pink Lady apples which are so nice and light and crisp this time of year. And they look great in the salad, all green and pink. Find a blue cheese that you like, any variety will do. I like the Point Reyes but can't always find it so I get what I can.  I like a nice variety of greens, it makes the salad more interesting to get different flavors and textures. 

Ingredients: 
Various greens:  Escarole, curly endive, baby greens 
Pecans, Toasted and chopped 
Celery, sliced very thin 
Pink Lady Apples, sliced very thin 
Point Reyes Blue Cheese

Dressing:
3 tbsp apple cider vinegar 
1 tbsp shallot, minced 
1 tsp Dijon mustard
1 tsp sugar 
1/4 cup canola or grapeseed oil
2 tbsp olive oil 
Salt and Pepper 

To make the dressing:  in a small bowl combine the vinegar, shallot, mustard and sugar. Whisk and allow to sit for 10 miutes.  Whisk in the two oils and salt and pepper to taste. Done. 

Make sure your lettuces are well chilled and crisp. 

Toast the pecans.  Break up the blue cheese into small crumbles. Slice the celery and apple.  

Put greens into a large salad bowl, add the nuts, apple and celery.  Dress and toss.  Plate and then top each with some of the blue cheese.  

Thursday, October 31, 2013

Maple Glazed Carrots


When I make vegetables I tend to keep it simple.  However, that can get boring, so occasionally I like to find a recipe that is special.  I especially like this during the holidays when I tend to cook a little more creatively.  Carrots are a nice side dish and if you add in same mustard and maple syrup this makes for an extra special dish. 

You can use the nice sweet little baby carrots whole, or simply use the large ones and slice them in half long ways so they don't take forever to cook. 

These also look nice when you serve them. 

Ingredients:  
2 Tbsp olive oil 
2 lbs carrots 
1/3 cup pure maple syrup 
2 tsp Dijon mustard
1 cup water  
salt and pepper 
1 tbsp fresh tarragon, chopped

In a large skillet or dutch oven heat the olive oil over medium heat, add the carrots and saute for 5 to 7 minutes until they just start to get brown.  Add the syrup, mustard, water, and salt and pepper.  Cover and reduce and simmer for about 10 minutes or until carrots are tender.  If carrots cook too quickly remove them from the pan, then allow the sauce to continue to reduce until you get the desired consistency.  The sauce should be syrupy.  If desired, sprinkle chopped tarragon over when plating. 

Thursday, October 10, 2013

Baked Penne with Butternut Squash and Four Cheeses

Can you say comfort food?  While this recipe uses penne pasta it's kind of like mac and cheese when you think about it.  Designer mac and cheese.  

There are a few layers to this dish.  You roast the squash, make the bread crumbs, make the cheese sauce, then put it all together. It does take a little time, as all good things do.  You can use gluten free pasta if you like, or whole wheat, whatever your preference.  

This is great for a pot luck, or if you're having family over. You can make one large pan full, or make it in small pans so that you have leftovers to freeze. I use 3 gratin pans when I make it so I have one for now, one for a few days later, and one to freeze.  Or one to give to a friend. 

About the cheese. The amounts below are approximate.  Don't sweat the exact amounts. Any combination of cheeses is going to taste great. 

Ingredients: 
1 pound butternut squash
2 tbsp olive oil 
1 tbsp fresh sage, chopped 
1 pound penne pasta 
Sea Salt  
Pepper, freshly ground 

Cheese sauce: 
3 tbsp unsalted butter
3 tbsp flour 
2 cups organic heavy whipping cream 
2 cups water 
1 1/2 cups fontina cheese, grated 
3/4 cup blue cheese 
1/2 cup Pecorino
3/4 cup Parmesan 
Pinch of nutmeg 
Salt and pepper

Topping: 
3 slices bread 
1/2 cup Parmesan
1 tbsp sage, chopped
2 tbsp butter, melted 
Salt and pepper 

Preheat the oven to 400 degrees. 

Peel the squash, then cut into approximately 1 inch cubes. Place the cubed squash in a bowl.  Add olive oil, salt and pepper, sage and toss well to coat. Place on a baking sheet. Roast in the oven for 20 to 30 minutes. The squash should be soft and cooked through. 

To make the topping: cut off the crusts of the bread, then cut bread into cubes. Put in a food processor and pulse until fine. Transfer to a bowl. Add the melted butter, salt and pepper, Parmesan and sage.  Set aside. 

To make the cheese sauce: Pour the cream into a container and add 2 cups of water to it and mix.  In a medium saucepan melt the butter over low heat. Add the flour, stirring constantly, making a rue. Cook 3 to 4 minutes then slowly start adding the cream and whisking to prevent any lumps.  Slowly turn the heat up and allow to cook for about 10 to 15 minutes then add the cheeses, nutmeg, salt and pepper. Remove from the heat. 

In the meantime cook the pasta according to package directions.

Mix together the pasta, butternut squash, and cheese sauce. Pour into a 9 x 13 baking dish, sprinkle the bread crumb topping over the top. 

Bake for 30 minutes. 

Wednesday, September 18, 2013

Marinated Olives


It's nice to have olives on hand for quick entertaining. We make a lot  of appetizers in our house and olives are always part of the offering.  It's easy to buy olives in the store and then bring them home and make them extra special. I marinade them in a few ingredients and after a few days or even a week they are really wonderful.


Ingredients:
olives and juice
1 large bay leaf
fresh rosemary sprig
2 whole garlic cloves
Orange rind, or lemon
olive oil

Make sure you use a clean sterilized jar to store the olives in. 

Into the jar put the bay leaf, rosemary, garlic and the citrus rind.  Next fill the jar with olives.  Now you can use either the juice the olives came in or olive oil. Fill to the top of the jar to cover the olives. 

Allow to sit, refrigerated, for several days.  These will keep in the fridge for a few months.  I take out only what I am going to serve, then put the jar back in the frig until next time.  I remove only the olives and leave the other ingredients in the jar until the jar is empty.

There is another way to make olives special which is extra special.  You can put all these ingredients into a small saucepan and heat it just until hot, then put into a serving bowl, allow to cook slightly, and serve warm. They are really good served like that and you don't have to make them ahead of time. 

Tuesday, August 20, 2013

Pollo Alla Diavola


Pollo Alla Diavola translates to devilish chicken. Alla Diavola refers to using chili's in the recipe as it's supposed to be hot and spicy like most Latin things are.  However, I have to say that we were quite surprised that this dish was not really hot. It had an excellent flavor but no real heat, so don't be afraid to make it if you are not a fan of hot food. The chili sauce added great flavor, and it was moist and juicy.

This dish was inspired by Bobby Flay's show BBQ Addiction on Food Network. It is our new favorite show.   I have never seen my husband watch a cooking show and be so focused. He even rewinds the DVR sometimes if he has to see something over again. He is totally channeling Bobby these days and I am the lucky recipient of his work. 

For this recipe you need a whole chicken.  There are only two of us and I always experience a little sticker shock when I buy a whole organic chicken.  I don't usually spend $18 on meat for one meal.  But then I realized that this chicken would feed us for more than one meal. As it turns out we got three meals out of this one, so that's only $6 a meal.  I'm sold. 

Pick any combination of dried chili's you like. We had a few different kinds in the pantry so we used all three.  We used an ancho and a generic California chili because they provide that deep depth of flavor but they are not hot. Then we added a couple of the tiny little red Asian chili's that for the heat.  We used only half of this chili oil for the whole chicken we grilled and kept the other half in a glass jar in the refrigerator. A week later we made chicken again and used the rest of the oil. 

1 whole organic chicken, butterflied
3/4 cup olive oil 
1 tsp dried oregano 
1 tsp salt
4 to 6 black peppercorns 
4 or 5 dried chili's
3 large garlic cloves
  
In a small dry saute pan heat the chili's for a few minutes to bring out the flavor.  Add the peppercorns, garlic, oregano and 1/2 cup of the olive oil. 
Heat on low simmer for about 5 minutes until the oils release and the air is fragrant  Turn off heat and allow to sit for 15 minutes.  Pour into a food processor or blender, add the salt and puree until smooth.  If needed you can add an additional 1/4 cup of olive oil. Pour into a glass jar for storage. 

Butterfly the chicken by cutting out the backbone.  We used a pair of kitchen shears which made it a pretty easy process. Then press it down flat to help it cook evenly.  There are videos on line if you want to watch a how to.  

With a pastry brush brush on the chili oil all over the chicken.  Allow to marinate for at least 30 minutes.  Put chicken on the grill and cook for approximately 10 minutes on direct heat, skin side down. You want a nice brown crisp skin. Flip it over and cook approximately another 30 minutes on indirect heat. Try to maintain the temperature at 400 degrees. Check the internal temperature until it comes to 160 degrees  Remove and allow to rest for 10 minutes before carving.  


Thursday, August 15, 2013

Black bean and mango salad


I am not a big meat eater so I am always looking for way of getting more protein into my diet. I love black beans so this seemed like a natural.  This is a simple salad that can be made ahead and kept in the refrig for a day or so. It's great for a picnic or as part of a buffet.

Ingredients:
2 c black beans, or 1 14 oz can
1 mango, diced into 1/2 pieces
1/2 small red onion, small dice
Juice and zest of one lime
1/2 cilantro, chopped

Rinse and drain the beans. Put them into a bowl, add the rest of the ingredients and toss.  Chill for at least 30 minutes or longer if desired.  The flavors will marry as it sits and become more complex.

Easy peasy. Enjoy! 

Coconut flour and chia seed mini muffins


I've been experimenting a lot with gluten free flour products and coconut flour is my new favorite so I tried making these muffins with coconut flour and chia seeds.  Chia seeds are so healthy because they are a great source of omega 3's.  If I can get them into a muffin I'm going to be feeling pretty healthy when I eat it. 

The difficult part about not eating gluten is that I desperately miss bread.    I used to make homemade bread and eat it while it was still warm with butter. My mouth is salivating.  So you will understand that since I can't do that anymore I really miss bread and bread like products. If I can find a recipe that helps with that craving and it is healthy I am in.  I made a batch of these and kept them by the coffee maker for a few days so I could have two with my coffee each morning. What a splurge for me!

Remember these are mini muffins, not full size, so they are tiny. These would be great if you were having the girls over for brunch. It's a nice little treat but not so horrible anyone is going to feel guilty about eating it.   

Ingredients: 
3 large eggs, room temp 
1/4 unsweetened applesauce 
3 tbsp honey
2 tbsp coconut oil, melted 
2 tbsp chia seeds 
1 tbsp lemon zest 
1 tsp vanilla 
1/4 coconut flour
1/2 tsp baking soda
1/2 tsp ground ginger
Sea salt, pinch 
Dried cherries, handful

Preheat the oven to 350 degrees.
  
Use paper liners in the mini muffin pan or cooking spray for prevent sticking.

In a food processor puree the eggs, applesauce, honey, coconut oil, chia seeds, lemon zest, and vanilla.  Add the coconut flour, baking soda, ginger and salt and puree until smooth. 

Divide that batter between 12 muffin cups.  Press a few pieces of dried cherry on top of each muffin.  Press down slightly so they don't pop out while baking. 

Bake for 20 minutes or until dry when tested with a toothpick inserted in the center. Cool completely in the pan. 

Store in an airtight container.  

I want to thank Daily Blog Bites.com for the recipe. 

Thursday, July 11, 2013

Lemony Potato Salad


Those of you who know me know I love lemons and this potato salad fits the bill with the lemon zest and juice soaking into the warm potatoes. Yum!
This recipe does not contain mayonnaise like more potato salad recipes which is another reason I like it.  

This recipe is best made and eaten immediately.  I like eating it while it is still warm when the flavor of the lemon pops. But I've had it leftover and it's just fine. 

A word about the potatoes.  The size of these yukon gold potatoes vary.  I've purchased bags that have the little ones, all about 2 inches, and those are the ones I prefer. They cook in 20 minutes and you only to have to cut them in half when they are done. However, I've also had to buy them when they are much bigger which means you have to increase the cooking time. Additionally  I've discovered that it is not a good idea to cut them in half prior to cooking, they get too soft. So cook them whole and try to find the little ones. 

Ingredients: 
4 slices of bacon 
zest of one lemon
1/4 cup fresh lemon juice
1 tbsp fresh rosemary, minced 
3 garlic cloves, minced 
1/3 to 2/3 cup olive oil 
3 pounds Yukon Gold potatoes
Kosher Salt 
3 celery stalks, including leaves 
Salt and Pepper 

Cook the bacon. Drain well and cool then chop into small pieces and set aside. 

In a large pot bring water to a boil. Add a tbsp of kosher salt. Add the cleaned whole potatoes.  Bring to a boil again, then reduce slightly and cook for approximately 20 minutes. Test for doneness with the tip of a sharp knife.  They should be done but not mushy, you want your salad to hold together with firm potatoes. 

While the potatoes are cooking make the dressing.  In a small bowl zest the lemon, then juice the lemon. Measure out 1/4 cup of juice, add that to the bowl. Add the minced garlic and rosemary. Add 1/3 cup of good quality olive oil. Mix to combine and allow to sit while the potatoes cook. 

Chop the celery along with the leaves. 

When the potatoes are done put them into a colander in the sink and allow them to drain and cool. This will take about 20 minutes   Once you can handle them, place them on a cutting board and start cutting each potato in half. Put the potatoes into a large bowl. Add the dressing, some salt and pepper, and mix gently allowing them to sit for a few minutes to absorb and dressing. Then add the celery and the bacon and mix again.  If the potatoes absorb all the olive oil add a little more just to make sure they are not dry.  

This is a perfect dish to serve with BBQ or take on a summer picnic. 

If you want to make this vegetarian leave out the bacon.

Thursday, June 27, 2013

Orange Chicken stir fry with Sugar Snap Peas


Chicken, chicken, chicken.  We all seem to be eating lots of chicken.  I don't know about you, but I get board with it pretty quickly.  One night I had this lonely chicken breast staring back at me as if it was challenging me......waiting for me to do something creative with it.  So this recipe is what I came up with.  I love the orange chicken we get at the Asian restaurant so I thought this might be good.  It's nowhere near as good as the restaurant but it'll due for a quick week night meal. 

Serves 2

Ingredients:
3/4 cup brown jasmine rice 
Zest of one orange 
1/2 cup orange juice, freshly squeezed 
2 Tbsp soy sauce or liquid amino 
1 Tbsp cornstarch 
1 Tbsp coconut oil
1/4 of a red onion, thinly sliced 
pinch of red pepper flakes 
1 large chicken breast, cut into bite sized pieces 
Sea Salt
Pepper, freshly cracked
Snow Peas, a large handful, enough for 2 servings
Sesame Seeds 

Rinse the rice well and allow to drain.  In a small sauce pan heat 1 1/2 cups of water and a 1/4 tsp sea salt, add the rice.  Bring up to a boil, then lower the heat and cook very slowly, slightly covered, for 35 minutes.  Turn off the heat, stir, and allow to sit, fully covered, for 10 minutes before serving. 

To make the sauce:  Zest the orange, juice the orange and put into a small bowl, add the soy sauce and cornstarch. Whisk until the cornstarch is fully dissolved. 

In large sauce pan or wok, heat the oil, add the onions and pepper flakes. Saute for 30 seconds. Add the chicken, salt and pepper. Stir fry for approximately 4 minutes. Add the sauce and snow peas.  Cook and stir until the sauce has thickened and the peas are done, approximately 2 minutes. 

Serve in a bowl, brown rice down first, then chicken mixture over the top.  Sprinkle with sesame seeds. 

Sunday, June 16, 2013

Simple Shrimp with a Honey Mustard Glaze


This is by far the easiest recipe I have ever posted.   I've made this for a picnic and it works out really well.  If you need to take a dish to a get together you can put this together in minutes. It's fast! And what's so surprising is that it tastes so darn good. Shhhh.......don't tell anyone how fast it is. Let them think you spent some time putting this together. 

You can use a grill to cook these or simply use a grill pan on top of the stove.

Make sure your shrimp are cleaned, peeled and deveined.  I leave the tails on to act as a handle to hold. 

Ingredients:
1 1/2 pounds large shrimp
3 tbsp Dijon mustard
2 tbsp honey
1/4 cup fresh lemon juice
2 garlic cloves, minced

Combine the mustard, honey, lemon juice and garlic in a small bowl.  This will be your glaze.  Add the shrimp and toss well to coat.  Allow to sit in this for at least 15 minutes then saute or grill for 1 to 2 minutes per side and they are done.

You can eat them right away or you can allow them to cool and them put them into a container with a top and put them in the cooler for the picnic. They will hold well for a couple of hours.

Friday, June 14, 2013

Grilled Asparagus with Mustard


Grilled asparagus is perfect the way it is, but I thought this idea of adding some mustard sounded interesting.  It adds a different flavor and makes the vegetable very moist and flavorful.  I think it's nice for a change, and I love mine on the mustardy side, its got a little kick. This pares well with some grilled meat.

I also don't like washing a lot of dishes so I try to make it all on one dish. I use a platter so I can mix the dressing then add the asparagus and toss it to coat. I then allow it to sit and marinate until I am ready to cook it.  You can cook it on the grill or use a grill pan.  You want some high heat so you can cook it quick, and you want those beautiful grill marks. 

Ingredients: 
1 pound asparagus 
2 tbsp mayonnaise 
2 tbsp mustard, grainy or Dijon
2 tbsp olive oil 
2 tbsp lemon juice 
1 garlic clove, mined ( or garlic salt) 
Salt 
Pepper 

I do not even measure when I make this. I just eyeball it. I pour it all on the platter, mix it with a spoon, then put the asparagus on the platter and toss it to coat well. 

Allow it to sit for a least 30 minutes, then grill for a few minutes.  You can allow it to sit for a little bit afterward and serve it a room temp. This is a good staple for the summer grilling season. 

Wednesday, May 29, 2013

Grilled Romaine Salad


I know it might sound strange to grill lettuce, but let me tell you, this is a great way to shake it up a bit. We eat a lot of salad in our house so having something different like a grilled salad keeps things interesting.
Plus anytime I can cook an entire meal on the grill I am happy. It keeps the kitchen clean and there are no pots and pans to wash. 

Get all your ingredients ready.  Once the lettuce goes on the grill you have to be ready to assemble in a quick second. 

Ingredients: 
2 heads of romaine 
4 strips of bacon 
2 ounces blue cheese 
2 small tomatoes
2 tbsp bacon drippings
2 tbsp balsamic vinegar 
1 tbsp Worcestershire sauce  
2 tbsp olive oil
Freshly ground pepper 

Wash, dry and crisp up the lettuce. Cut each head in half, wash very carefully so it does not fall apart. It must remain in tact to put on the grill. Drain it well.  Wrap it in paper towels then put into a plastic bag and place in the refrig for a few hours to crisp up. 

Cook the bacon.  Cut raw bacon into small strips then saute until brown and crisp.  Drain the bacon on a paper towel until ready to use. Retain 2 tbsp of bacon drippings. 

Make the dressing. Whisk together the bacon drippings, balsamic, W sauce, olive oil, and pepper. 

Cut up the blue cheese and dice the tomatoes. 

Put the romaine on the the grill and cook for approximately 2 minutes per side. You want a slight char and some grill marks but you don't want to cook it until it all starts to wilt. It should have some crunch left to it. 

Place romaine on a platter, drizzle with dressing, top with blue cheese and tomatoes. Serve immediately. 

Serves 4.  

Tuesday, May 7, 2013

Chickpea Flatbread


This was my first time cooking with chickpea flour and I have to say I was pleasantly surprised.   I'm always looking for gluten free recipes, and recipes that I can eat similar to bread, since I can't eat bread anymore.  This recipe seemed promising so I thought I'd give it a try. 

About chickpea flour:  It is low in saturated fat, cholesterol and sodium.  It is a good source of dietary fiber, magnesium, copper, folate, and manganese. It is also a low glycemic food and therefore I would recommend this product to my diabetic clients. 

This recipe makes 6 pieces and you can use a 11 x 7 inch baking dish or a baking sheet pan.  Its nice if you cook it up thin so it's not too heavy. I like to top it with tomatoes that I normally make for brushetta, but use your imagination.  I also roasted some asparagus one night and put that on top. I've also done a pan of caramelized onions then added that to the pan prior to cooking so it cooks up in the flat bread. 

If I serve this as a meal I serve two pieces along with a salad. If I serve them as appetizers for a dinner party I serve one piece per person.  If it's cocktails I cut them into much smaller pieces and serve as finger food.  You can easily double this recipe and bake it on a baking sheet pan.  You would increase the temp to 450 and cook for 35 to 40 minutes. 

This takes a little advance planning as it has to sit for at least 2 hours before baking.   I prefer to allow it to sit for 6 hours or even overnight. I think it enhances the flavor. 

Ingredients: 
1 1/2 cups chickpea flour 
3 cups warm water 
1 tbsp sea salt 
Freshly ground black pepper
2 tbsp finely chopped rosemary
1/4 cup olive oil  

Pour the water into a large bowl.  Slowly whisk in the chickpea flour, salt and pepper.  Let stand at room temp for 2 hours.  

Preheat the oven to 350 degrees.  

Stir in the rosemary and olive oil. 

Brush a sheet pan with olive oil then pour the batter into the pan.  It should be solid when done and slightly brown. 

Bake 40 minutes.  

Cut into 6 pieces.

Tomato topping:  Cut up two tomatoes into small dice and put into a bowl.  Add 2 to 3 cloves of minced garlic, salt and pepper, a tbsp or more or chopped basil, and two tbsp olive oil.  Allow to sit for at least 30 minutes for the flavors to develop.  

Another topping I would recommend would be grilled veggies. 

You could also other items prior to cooking:
caramelized onions
bacon
prosciutto
additional herbs
garlic 
cheese, pecorino, Parmesan etc. 
greens like escarole 

As you can see there are lots of things you can do with this recipe.  

Tuesday, April 30, 2013

Strawberry Shortcake with Lemon Cream


It's strawberry season and we were having dinner guests so I wanted to make a strawberry shortcake. But not just the regular ol' thing.  First of all, it had to be gluten free so I could eat it, and I wanted it to have a little twist.  After all, when this couple comes over they expect really good food from my kitchen.  

The first thing I tried to search out was a good from scratch shortcake recipe, but to no avail.  I ended up buying a mix at Whole Foods, a gluten free muffin mix.  I spiffed it up with some lemon zest and juice and made muffins which I then cut in half and used as the shortcake. 

I put half the muffin on the plate, then piled on some of the cream, then the strawberries, and then topped it with the other half of the muffin.  It looked pretty cute! Please excuse this picture. I forgot to take a picture when I plated it so my husband took a shot with his phone before he demolished it. 

For the strawberries I washed and cleaned them, cut them into slices, added a little sugar, I mean a little.  Then I smashed just a few to get the juices going and allowed it to sit for a an hour.  

For the cream I took 1 cup of organic whipping cream and whipped it until stiff. Then I added one jar or my homemade Meyer Lemon Curd, gave a little mix.  I did not mix it completely because I wanted it to have ribbons of cream and curd going through it. 

And that was all it took.  It was quite good.  My dinner guests liked it so much they asked if they could take the rest of it home to eat the next day.  Mission accomplished!

Thursday, April 25, 2013

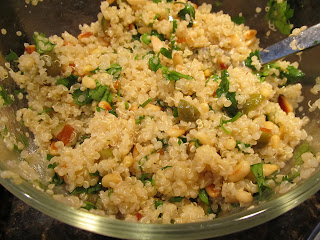
Lemony Quinoa Salad with Pine Nuts and Olives


This recipe is so simple that you might think it doesn't have much flavor, but think again. The flavors are somewhat supple but when you taste the combination of flavors you realize it all comes together in a beautiful way. 

Ingredients: 
1 cup vegetable broth 
1/2 cup quinoa, rinsed   
1/4 cup pine nuts, toasted 
large handful of cilantro, chopped 
2 tbsp green olives, chopped  
Juice of 1/2 lemon
2 tbsp lemon olive oil 
Sea Salt 

Rinse the quinoa well.  In a small saucepan heat the broth, add the quinoa, bring to a boil, cover with lid slightly askew, then reduce to very low and cook for 12 minutes. Remove from heat. Keep cover on and allow to sit for 10 minutes. (This cooks similarly to rice.)  

Put the quinoa into a mixing bowl.  Toast pine nuts in a hot skillet until just slightly toasted.  Add to bowl.  Chop the cilantro and add to the bowl. Cut each olive into 4 pieces, add to the bowl. Squeeze the lemon juice over the quinoa, catching any seeds.  Add the salt and approximately 2 tbsp of lemon olive oil.  Mix well.  Cover and refrigerate until needed.  Allow to come to room temp before eating.  If it gets somewhat dry, add a little more olive oil. 

You can easily double this if you are serving more people or want to add this to a buffet.  I like it for summer picnics.  But then I like everything for summer picnics. 

Sunday, April 21, 2013

Almond Milk Chocolate Pudding


Pudding.  It's a dessert from my childhood and I have fond memories of it. My grandmother taught me how to make homemade pudding when I was quite young, and I fell in love with it.  Much as I would love to eat it as an adult I don't because it is usually made with milk which is a problem for both me and my husband.  Over the years I've tried various recipes with other products like soy or rice milk but they leave a lot to be desired. 

This recipe is made with almond milk which is what we use in our house on a regular basis.  It is also made with the best quality cocoa powder, which results in a surprisingly rich end product.  I was quite surprised at how good this was so it is now has a permanent place in my recipe book. 

Ingredients:
1/2 cup light brown sugar, packed 
1/4 cup unsweetened cocoa powder 
2 1/2 Tbsp cornstarch 
1/2 tsp cinnamon 
1/8 tsp salt
2 cups unsweetened almond milk
1 1/2 Tbsp unsalted butter, cut into small dice
1/2 tsp vanilla 
Topping:  freshly whipped cream 

In a medium saucepan combine brown sugar, cocoa, cornstarch, cinnamon, and salt, whisk to combine, then add almond milk.  Bring to a boil, continue whisking and cook for 1 minute until thick. Remove from heat then whisk in the butter and vanilla. Cool and chill well. Cover with plastic wrap to prevent skin from forming.    You can leave it all in one bowl, or spoon into individual bowls or cups for single serving sizes. Makes 4 servings. 

To serve, whip whipping cream, add a touch of vanilla and top the pudding.  You could also top with some sliced almonds. 

Saturday, April 13, 2013

Spinach Salad with Beets and Green Apple


Spinach. I always have it in the house. I use it in omelets for breakfast and in smoothies. I make salads a lot so sometimes I use half spinach and half other greens.  Gotta get my greens in every day. It contains fiber, protein, lots of vitamins and minerals, including vitamin K which is hard to come by, and calcium. Buy it. Wash it. Eat it. 

Ingredient amounts for salad are always tricky for me.  I eye ball it. How much do I need to serve two people?  Four people?  This recipe will serve four so I make approximately half of it for the two of us. You have to be exact. Just through in however much of each ingredient you want. 

If you want this to be vegetarian simply omit the bacon. 

Ingredients:
4 beets 
1 green apple 
8 strips bacon 
4 cups raw spinach 
Walnuts, a handfull 
4 tbsp Goat Cheese

Dressing:
2 tbsp Sherry vinegar 
1 tbsp maple syrup 
5 olive oil 
Sea Salt
Pepper, freshly ground 

Make sure the spinach has been washed, de-stemed, and chilled well.  You do not want the spinach to wilt when you add the dressing. It needs to be cold and crunchy.  

Wash the beets well, dry and place on a baking sheet.  Roast in the oven on 400 degrees for 1 hour.  Allow to cool.  Peel and cut into wedges.

Cook the bacon.  Cool and cut into small pieces. 

Toast the walnuts in a saute pan until slightly brown.  Cool and cut into small pieces   

Make the dressing: combine all the ingredients in a small bowl and whisk well.  Add enough salt and pepper to season the entire salad. 

When ready to assemble cut the green apple into very thin slices.  

Dress the spinach and plate it.  Then sprinkle on walnuts and bacon, then pile on the beets and green apple.  Top with approximately a tablespoons of goat cheese for each serving.  

Sunday, March 31, 2013

Oat Flour Banana Muffins


I've tried so many gluten free recipes over the past year.  I'm sorry to say that most of them are not good. And some are worse, horrible!  So when I made these muffins and they actually came out I knew I had to share the recipe with you.  

For this recipe you will need to grind some rolled oats or buy a good quality oat flour.   There is very little sugar in this recipe which is another reason why I like it so much. And with the addition of nuts they are especially satisfying. 

Dry Ingredients:
2 cups old fashioned oats, gluten free
2 tablespoons ground flax seeds 
1 tsp ground cinnamon
1 1/2 tsp baking powder
1/2 tsp baking soda 
1/4 cup chopped walnuts

Wet Ingredients:

4 very ripe bananas 
1/2 cup unsweetened apple juice 
1/2 cup unsweetened applesauce 
1 1/2 tsp vanilla
1 1/2 tsp apple cider vinegar 

Grind the oats into flour using a Vitamix or other grain grinder. 

Put all dry ingredients into a large mixing bowl.  

Puree the wet ingredients in a food processor just until smooth. Do not over blend.

Pour wet over dry ingredients and mix with a spatula. Do not over mix. 

Fill muffin pan with papers, or use cooking spray, and fill 2/3 full. Bake at 350 degrees for 22 minutes. A toothpick inserted in the center of a muffin should come out clean when done.

Makes 12 muffins.  These freeze well. 

Options: you could also add some fruit to this recipe.  Perhaps some fresh blueberries, or some finely grated green apple.  You will need to increase the baking time however. 

Original recipe from Forks over Knives.com 

True Food Cookbook


Andrew Weil, MD is the founder of the Arizona Center for Integrative Medicine and a partner in True Food Kitchen.  He is the author of several bestselling books including Spontaneous Happiness, The Healthy Kitchen, Healthy Aging, and 8 weeks to Optimum Health. 

I've been following Andrew Weil for years. I subscribe to his newsletters, read all this article on health, and have such a deep respect for the man because of his integrative school in Arizona. He feels that our doctors come out of medical school not knowing anything about nutrition or how to help their patients achieve wellness through diet so he single-handedly opened the first integrative school to teach this to doctors. He is affecting the way medicine is taught in this country and now others are following in his footsteps.  He is a guru in the wellness community.  

The book is based on eating an anti inflammatory diet.  Why is this important?  Because inflammation is the root of all disease. If you can reduce the inflammation in your body you will reduce your risk of disease. 

Dr.  Weil has always taught diet first, medicine second, but when he decided to open an actual restaurant showing people how to eat I immediately had to see it. Fortunately for me there is a location close to my house in Newport Beach California.  I then purchased the book and started making some of the dishes in my own kitchen.  I am a pretty healthy eater anyway but having a cookbook like this makes eating right all the more enjoyable.  The recipes are not difficult and color photos are so nice to see. It's fun to make a dish and then see if you end product looks like the photo.  Trust me they won't look as good! 

I am not a broccoli fan but the Braised Broccoli with Orange and Parmesan made me a believer  Now I can eat it without saying yuck. The Kale Salad is one of the best selling items at the restaurant and it is in the book. There is a Citrus Sesame Sauce recipe that I use on everything. He shows it on green beans but you can make a batch and put it literally on anything.

Good eating should be enjoyable but also do something healthy for the body. The recipes in this book do just that. 

Sunday, March 24, 2013

Homemade Lox


Yes you read that right.  I have always wanted to try my hand at making my own lox. I was standing in the store looking at some beautiful wild salmon that was on sale and decided right then and there that the time had come.  I've seen this done on a couple of food shows and I was so curious to see if I could recreate the same thing in my own kitchen. It's amazing what you can do when you have the right instructions and the best quality ingredients. 

There is a mustard sauce that goes with this at the end of the recipe. You can use it with the lox or use it on everything else. I baked some salmon one night and used it on that.  The sauce is fantastic! 

Ingredients for lox: 
3 pounds fresh wild salmon
1 large bunch of dill 
1/2 cup kosher salt
1/2 cup sugar 
2 tbsp peppercorns 
1 tbsp fennel seeds


Cut the salmon in half and place one half in a deep dish, skin side down.  Cover with the chopped dill.  Combine and salt, sugar, peppercorns, and fennel in a small bowl and stir to combine. Sprinkle over the fish. Place the other half of the fish on top, skin side up. Cover the dish with aluminum foil. Place it in a larger dish then put some weight on top of the fish. I used big 32 oz size cans of tomatoes.  Place in the refrigerator for 2 to 3 days, turning every 12 hours. You will need to remove the cans, open the foil, and turn the fish over. Cover back up again, place the weight on, and put it back in the frig until the next turn.

Once it is done curing, remove all the stuff from the fish. Don't wash it because you will lose flavor, simply take a paper towel and wipe it all off until it is clean.  Then take a very sharp knife and start slicing thin slices on the diagonal. Cut down until you get to the skin then stop. 

You can serve this on pumpernickel bread with the mustard sauce, or use on bagels with cream cheese. 


The perfect Sunday morning breakfast!

Ingredients for mustard sauce: 
1/4 cup Dijon mustard
1 tsp dry mustard 
3 tbsp sugar
2 tbsp tarragon vinegar
1/3 olive oil 
3 tbsp fresh dill, chopped 

Combine everything but the dill in a small bowl and whisk until it is combined and emulsified.  Once it is thick and ready to serve add the dill and stir in. 

The original recipe is from Ina Garten. 

Wednesday, March 20, 2013

Miso soup with buckwheat, bok choy, shitake


I could live on soup.  It's warm, it's comforting, it's delicious.  You can make soup out of anything, and I can make a big batch of it and have it ready to eat for days.  You know my motto, cook once, eat twice! 

I have a gluten intolerance so I've been experimenting with grains.  Buckwheat is gluten free and it's a good replacement if you miss pasta like I do. And it's inexpensive. I go to the local Asian market and buy a package that contains about 7 or 8 bundles, which equates to enough for 7 or 8 meals, and it's only a few dollars. 

This soup takes some preparation so get into the kitchen and do all your chopping.  Once that is done it comes together very quickly.  For me it's always the washing and slicing and dicing that takes up so much time and energy.  I try to get his done early enough so that once we are hungry I can just get into the kitchen and this will be on the table in 10 minutes. 

This soup is aromatic and great for cold and flu season. The mushrooms and ginger are immunity building! 

Ingredients: 

2 tbsp olive or coconut oil 
1 tbsp freshly grated ginger 
4 scallions
3 garlic cloves, minced 
4 oz shitake mushrooms 
1 small sweet potato 
4 oz buckwheat noodles 
1 baby bok choy 
1 handful sugar snap peas 
1/2 cup white miso 
Lime wedges 
coarse salt

Peel and very finely mince the ginger. 

Slice the scallions and separate the white and green parts.  You will use the white parts to saute into the soup and green parts as a garnish when its done. 

Mince the garlic. 

Clean and slice the mushrooms. 

Peel the sweet potato and cut into 1 inch cubes. 

Wash and slice the bok choy into 1 inch slices.

Prepare the sugar snap peas removing any strings.

Dissolve the miso in a small amount of hot water so its ready to pour into the soup.

Cut the limes in wedges. 

In a medium pot heat the oil, add the ginger, scallion whites, and garlic and cook 1 to 2 minutes. Do not burn the garlic.   Add the sweet potatoes and 6 cups of water. Bring to a boil and cook until potatoes are tender about 6 to 8 minutes.  

Meanwhile cook the buckwheat noodles according to package directions.  Pour into a colander and allow to drain well. 

To the soup add the bok choy, mushrooms, peas, cook 1 minute.  Reduce heat to low and add the miso.  You  never want to boil miso.  Cook one minute more keeping the veggies crisp tender.

To serve:  Put noodles into the bowl, add some of the soup, top with the scallion greens and a wedge of lime. 

Serves 4.