Showing posts with label Bread. Show all posts
Thursday, August 15, 2013
Coconut flour and chia seed mini muffins
I've been experimenting a lot with gluten free flour products and coconut flour is my new favorite so I tried making these muffins with coconut flour and chia seeds. Chia seeds are so healthy because they are a great source of omega 3's. If I can get them into a muffin I'm going to be feeling pretty healthy when I eat it.
The difficult part about not eating gluten is that I desperately miss bread. I used to make homemade bread and eat it while it was still warm with butter. My mouth is salivating. So you will understand that since I can't do that anymore I really miss bread and bread like products. If I can find a recipe that helps with that craving and it is healthy I am in. I made a batch of these and kept them by the coffee maker for a few days so I could have two with my coffee each morning. What a splurge for me!
Remember these are mini muffins, not full size, so they are tiny. These would be great if you were having the girls over for brunch. It's a nice little treat but not so horrible anyone is going to feel guilty about eating it.
Ingredients:
3 large eggs, room temp
1/4 unsweetened applesauce
3 tbsp honey
2 tbsp coconut oil, melted
2 tbsp chia seeds
1 tbsp lemon zest
1 tsp vanilla
1/4 coconut flour
1/2 tsp baking soda
1/2 tsp ground ginger
Sea salt, pinch
Dried cherries, handful
Preheat the oven to 350 degrees.
Use paper liners in the mini muffin pan or cooking spray for prevent sticking.
In a food processor puree the eggs, applesauce, honey, coconut oil, chia seeds, lemon zest, and vanilla. Add the coconut flour, baking soda, ginger and salt and puree until smooth.
Divide that batter between 12 muffin cups. Press a few pieces of dried cherry on top of each muffin. Press down slightly so they don't pop out while baking.
Bake for 20 minutes or until dry when tested with a toothpick inserted in the center. Cool completely in the pan.
Store in an airtight container.
I want to thank Daily Blog Bites.com for the recipe.
Sunday, March 31, 2013
Oat Flour Banana Muffins
I've tried so many gluten free recipes over the past year. I'm sorry to say that most of them are not good. And some are worse, horrible! So when I made these muffins and they actually came out I knew I had to share the recipe with you.
For this recipe you will need to grind some rolled oats or buy a good quality oat flour. There is very little sugar in this recipe which is another reason why I like it so much. And with the addition of nuts they are especially satisfying.
Dry Ingredients:
2 cups old fashioned oats, gluten free
2 tablespoons ground flax seeds
1 tsp ground cinnamon
1 1/2 tsp baking powder
1/2 tsp baking soda
1/4 cup chopped walnuts
Wet Ingredients:
4 very ripe bananas
1/2 cup unsweetened apple juice
1/2 cup unsweetened applesauce
1 1/2 tsp vanilla
1 1/2 tsp apple cider vinegar
Grind the oats into flour using a Vitamix or other grain grinder.
Put all dry ingredients into a large mixing bowl.
Puree the wet ingredients in a food processor just until smooth. Do not over blend.
Pour wet over dry ingredients and mix with a spatula. Do not over mix.
Fill muffin pan with papers, or use cooking spray, and fill 2/3 full. Bake at 350 degrees for 22 minutes. A toothpick inserted in the center of a muffin should come out clean when done.
Makes 12 muffins. These freeze well.
Options: you could also add some fruit to this recipe. Perhaps some fresh blueberries, or some finely grated green apple. You will need to increase the baking time however.
Original recipe from Forks over Knives.com
Tuesday, August 14, 2012
Crostini with Ricotta and Cherries
Seriously, I am in love with crostini. You can literally put anything on it and it is good. Beyond good. I've made it for years and I never get tired of it. But this year I thought I might try something new. Crostini with cherries? Sounds kind of odd right? Well, with the addition of the ricotta and lemon zest it all works.
Combine a cup of pitted and halved cherries with 1 tablespoon of honey or agave in a small saucepan just until the honey has melted. Turn it off and allow to sit and macerate for a good 10 to 15 minutes, or longer.
Brush 4 slices of rustic whole grain bread with olive oil and either toast in the oven or put on the grill. Toast until light brown and there is some crunch to the bread.
Mix about 1/2 cup fresh ricotta with the zest of one lemon and about a teaspoon of some very finely diced rosemary. Spread on the toast and top with the cherries.
Hum hum good! A sparkling glass of Proseco anyone?
Sunday, August 14, 2011
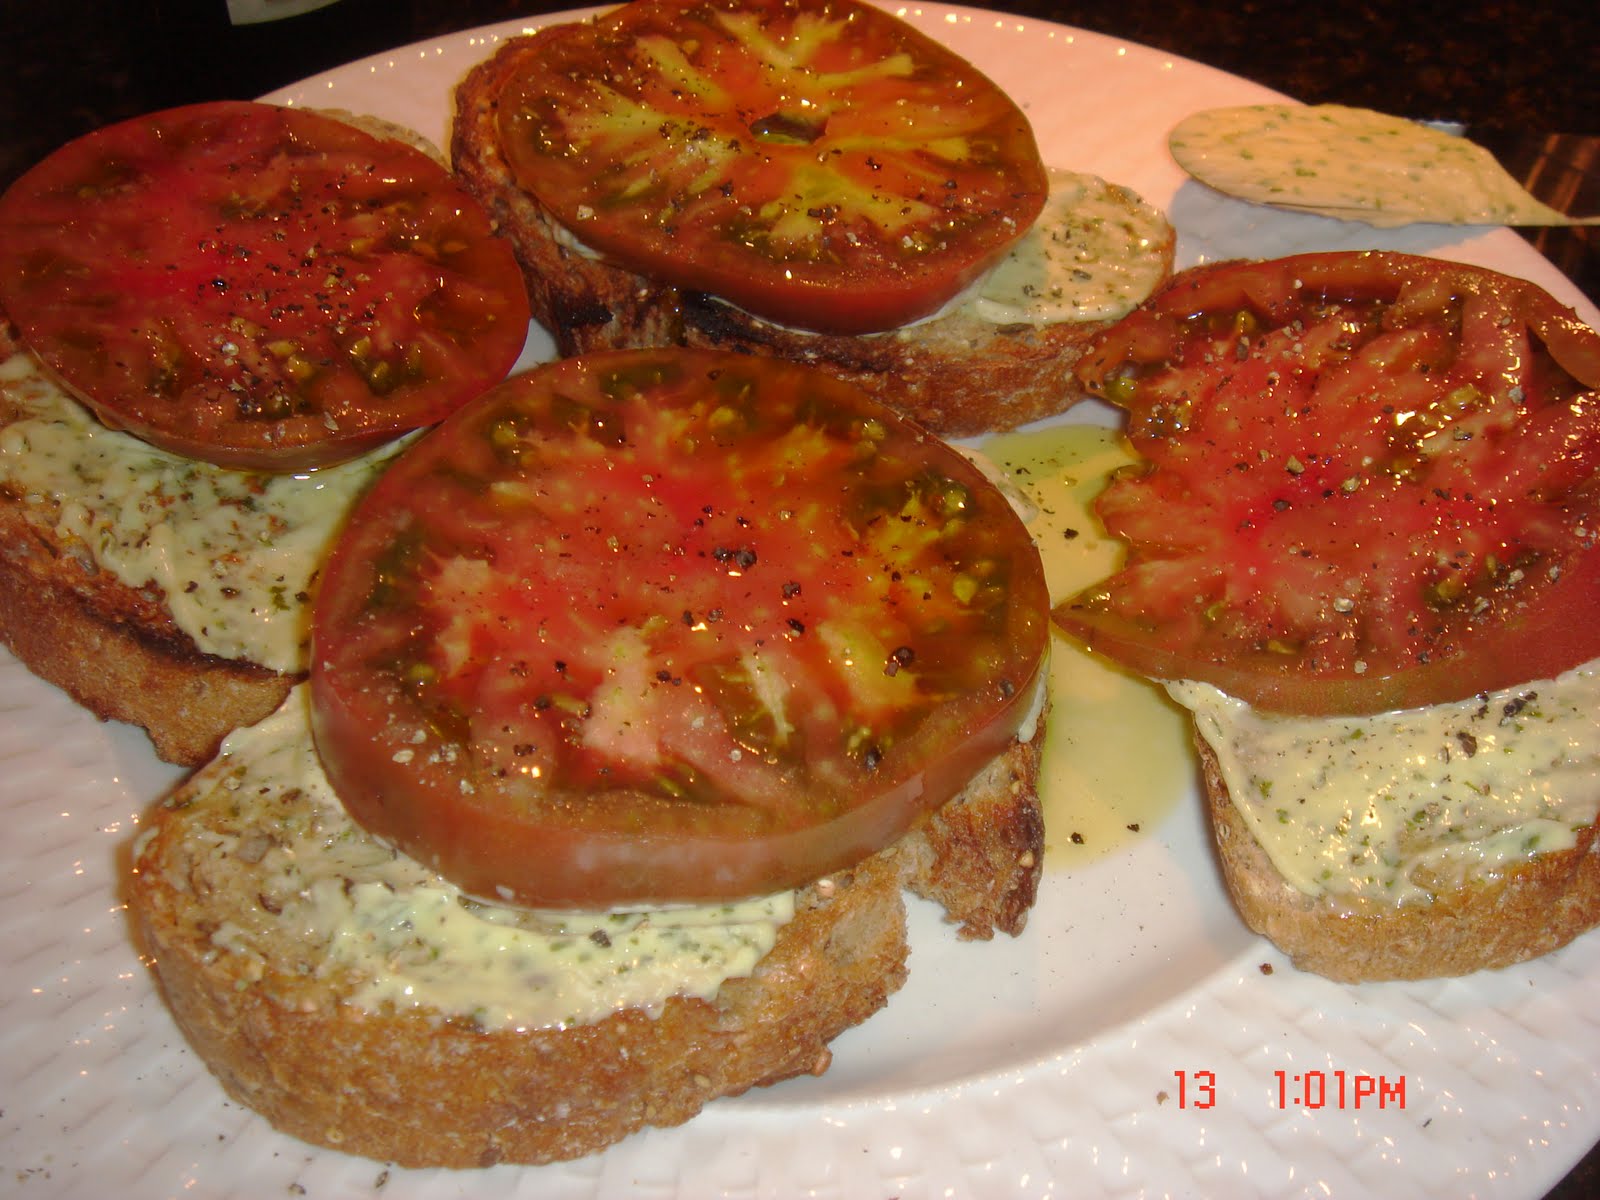
Tomato sandwiches with basil mayo
Every year I wait for the heirloom tomatoes to come into season. I don't know about you but I think the only way to get a good tomato is from your local grower, or grow them yourself if you have the room. Those tomatoes they sell in the supermarket year round are not tomatoes, they only look like tomatoes. They have no flavor and the consistency is all wrong. Go to the farmers market and buy fresh locally grown tomatoes and then you will know what a real tomato tastes like. I can eat them every day, and do, because I want to get my fill while they are in season. One of the best ways to use them up is to make tomato sandwiches. I eat them for breakfast, lunch, and dinner. Any time of day is good for a tomato sandwich. And since I made the basil mayo they are tomatoes on steroids.
Ingredients:
Multi grain bread, or any good quality bread, slightly toasted
Basil Mayonnaise (see previous recipe on blog)
Sliced heirloom tomato
Very good quality olive oil
Sea Salt
Freshly ground pepper
Toast your bread slightly. Smear with basil mayo. Top with a nice thick slice of heirloom tomato. Drizzle with olive oil, sprinkle with salt and pepper.
Open wide! I hope you get hooked on them just like I did.
Ingredients:
Multi grain bread, or any good quality bread, slightly toasted
Basil Mayonnaise (see previous recipe on blog)
Sliced heirloom tomato
Very good quality olive oil
Sea Salt
Freshly ground pepper
Toast your bread slightly. Smear with basil mayo. Top with a nice thick slice of heirloom tomato. Drizzle with olive oil, sprinkle with salt and pepper.
Open wide! I hope you get hooked on them just like I did.
Thursday, November 4, 2010
Making Ciabatta

Is that a beautiful loaf or what?
Fall is in the air. Thoughts of root vegetables and comfort food fill my mind. I no longer lust after juicy summer tomatoes but rather crave squash and meat and potatoes and the like. Like bread. Yep. Homemade bread, still warm out of the oven with a slather of butter. Just like that. Nothing more. It doesn't get much better than that. It is so gratifying to bake the bread and then to be able to eat it right out of the oven. Bread I made. When I first made this bread I would just stand over the bread and make ohing sounds. Now that I have had more practice I actually have some self control and can wait for dinner or at least until my husband gets home so we can have some together.
I love Ciabatta. It is the perfect bread. It's hard on the outside, but soft on the inside. It has lots of air bubbles which help to make the bread light and airy. I use it quite often to make crostini but I also love it toasted for breakfast. It tastes good alone or with stuff on it. It also freezes very well. If I buy a loaf I immediately cut it up and put it in a freezer bag and freeze it. That way I can pull out a slice at a time and it always tastes fresh when I want it.
What bothers me is that a nice artisan loaf of bread is getting close to 5 bucks these days. It occurred to me that this bread is really only flour and water. For 5 bucks??? Hum. For years I had a wish that I could make bread myself but after taking a couple of bread classes and buying several bread cookbooks I wasn't much closer to making anything I really wanted to eat.
Then one day I was watching America's Test Kitchen and they were making ciabatta. Fool proof ciabatta. Yea right! I had heard that before. I sat there watching every step very closely. I had recorded the show and proceeded to watch it a couple more times over the next couple of weeks. I finally sat down with a pad of paper and wrote down all the instructions and decided to get in the kitchen and give it a try. They were right, it was fool proof. I had success on my first loaf. But it was not quite good enough for me so I made it again and again and again. I am now happy to say that I think I have perfected this recipe. I can get in the kitchen and whip up a loaf of ciabatta like it's nothing. That being the case I have been making a loaf a week. That's about how long it lasts with two of us in the house.
The one thing about this recipe that you need to know is that you must start the biga (starter)the night before. I will typically do this on either Friday and Saturday night before bed depending on my day the next day. You have to be home for several hours to perform all the steps and get it baked. So plan ahead.
I am sure you can probably go on the America's Test Kitchen web site and pull up the recipe, which I would recommend. I have included the notes I took from the show below. I made a couple of slight changes to the instructions so if you dowload the recipe there will a couple differnet directions. You will need a pizza stone and the bread will be baked on a sheet of parchment paper. In addition I always use a kitchen scale to measure the ingredients when I bake. It is important that the ingredients be exact and the only way to accomplish that is to use a scale.
Ingredients:
Biga: 5 oz all purpose flour
1/8 tsp active dry yeast
4 oz water - room temp
Bread:
Biga
10 oz all purpose flour
1/2 tsp active dry yeast
1 1/2 tsp sea salt
6 oz water - slightly warm
2 oz milk - slightly warm
To make the biga: Add water to mixer bowl with paddle attachment. Sprinkle yeast over water and allow to dissolve. Turn machine on low and add the flour. Work for 1 minute. Cover bowl with plastic wrap and allow to sit overnight or at least 8 hours.
To make the bread: In mixer with paddle attachment add water, sprinkle with yeast. Allow to dissolve then add the rest of the ingredients. Turn mixer on low and allow to come together for about 1 minute. Dough should be sticky. Increase speed to medium low for about 4 minutes. At this point it should start to pull away from the side of the bowl. Change to a dough hook and mix on high for about 10 minutes. All of these steps are building the structure of the dough. Cover with plastic wrap and allow to double in size, about 1 hour.
Spray a large rubber spatula with cooking spray. Turn the dough on to itself starting at the outside of the bowl pulling into center. Do this all the way around the bowl about 6 to 8 times taking care not to deflate the dough more than necessary. Cover and allow to rise 30 minutes. This process helps to develop the air holes you want in the bread. Repeat this process. Allow to rise until doubled in size, about 1 hour.
Preheat oven to 450 degrees. It is important that the oven be very hot.
Place pizza stone in center of the over and preheat to 450 degrees. Cut a piece of parchment paper the size of the pizza stone and then sprinkle with flour. Turn the dough onto the paper and pull gently to form a large square, taking care not to totally deflate. Do not allow the dough to take in more flour, you want it sticky. Slide parchment paper with dough on to pizza stone and spray with water. Bake 5 minutes then spray with water again. Bake 22 more minutes or until center temp is 250. Total cooking time is about 27 minutes.
Allow to cool for one hour.
A word about dough rising time. The temperate of your kitchen is going to determine how quickly or slowly the dough rises. I have grantie counter tops so if I leave the bowl of dough on the counter the temperature is so cold that the dough does not rise as it should. Therefore, I have to put the bowl on something else to allow it to rise properly. When a recipe gives a time for rising it is only an estimate. You will need to adjust as you watch the dough rise to catch it at exactly the right time. This comes with practice.
Repeat this process once a week and start counting all the money you are going to save!
Wednesday, June 17, 2009
Cheese Danish
On Sunday mornings I make French press coffee. My husband looks forward to it every week. I usually get up before him, putter around in the kitchen, then bring him a cup in bed. When he hears me next to his bed he gets a big smile on his face. Ahhhh.....the coffee has arrived. It's one thing I do to spoil him because he gets such a kick out of it.
We have had this June gloom weather the past few weeks so last Sunday I decided I needed to make something special to go with the gloomy weather. I made these cheese danish and boy am I happy I did. Not only were they really easy but they were delicious. And it turns out, they are my husbands favorite danish. (I knew that!)
You can make these for your family next Sunday. I am giving you a recipe for a very small batch, it makes 4. Which is plenty for us two, we had one on Sunday and then again on Monday with our coffee. But if you want to make more just double it. That will give you eight. I cheated and used frozen puff pastry because making danish from scratch is a long and time consuming process. Better left for another day. The danish need to be eaten pretty quickly, they will not hang around the house for days on end, because the puff pastry gets stale.
The recipe: (makes 4)
- 4 ounces of cream cheese
- 2 tablespoons sugar
- 1 egg yolk
- 2 tablespoons ricotta cheese
- 1 tsp vanilla
- pinch of salt
- 1 tablespoon lemon zest
- 1 sheet puff pastry, thawed and ready to use
- 1 egg white (for egg wash)
Preheat the oven to 400 degrees. Line baking sheet with parchment paper.
In an electric mixer place cream cheese and sugar and blend until smooth. Add sugar, then the egg yolks and mix well. Add the ricotta, vanilla, salt and lemon zest and mix only until incorporated.
Lay the puff pastry sheet out and cut into four sections. Place the four pieces on the parchment lined baking sheet. Place a heaping tablespoon of the filling on each puff pastry piece then fold 2 edges towards the center to slightly overlap. See photo. Brush the edges with egg white to hold together. Brush the entire surface with the egg white to get a nice golden brown finish.
Bake for 10 minutes then rotate the pan and bake another 10 minutes. The result be a light flaky dough and a creamy cheesy lemony center.
If you want to get fancy you can add fruit. Strawberries or blueberries would be great.
I hope you spoil someone in your family with these. Even if it is only you.
Subscribe to:
Posts (Atom)