Wednesday, July 23, 2014
Green Lentil Hummus
I will admit that this appetizer is not exactly the most attractive looking dish. I mean its green, and there is not much you can do to it to make it attractive. You could add a few springs of cilantro for a garnish , which is even more green :) But it is delicious as well as healthy so its ok in my book.
I try to eat lentils on a regular basis, and I do love them, but the idea of making a healthy dip that I could serve to guests or take to a party is appealing to me. I like to show people that they can eliminate the unhealthy stuff and eat well.
This dip is good on crackers and pita chips, but I would also serve it with veggie crudites, and perhaps spread on a sandwich.
Ingredients:
3 cups veggie broth
1 cup green lentils
1 bay leaf
3 cloves garlic
3 tbsp fresh lemon juice
1/4 cup olive oil
1/4 tsp ground cumin
pinch cayenne pepper
1/4 cup cilantro
pinch sweet paprika
In a saucepan combine the broth, lentils, bay leaf. Bring to a boil, then cover and reduce to very low heat for 45 minutes. Uncover and allow to cool. Discard the bay leaf.
Put the lentils in the food processor. Add the rest of the ingredients and blend until smooth. Chill and serve.
Sunday, July 20, 2014
Quinoa Almond Pancakes
Who knew quinoa could be so darn good in pancakes? I was shocked how well these came out. And my husband loved them so these are a keeper. I will never make regular pancakes again!
I did not develop this recipe, it is from Jeanette's Healthy Living. This woman must be a genius! I've got to give credit where it's due.
Almond flour is a great substitute for white or whole wheat flour and I love using it. I buy it from Trader Joes and keep it in a freezer bag in the freezer. It will go bad quickly and this way I keep it fresh longer. I just take out the amount I need for a recipe and return the rest to the freezer. You can grind the almond meal a little more to make it lighter like a flour but I used it they way it is and it was fine.
I also found out that when I blended the batter in the vitamix it was extremely thick and hard to blend. The reaction is to add more milk, but if you do the pancakes will be too thin, more like a crepe, and they are extremely hard to flip. So try to keep the batter a little on the thick side. I also cooked mine in Ghee although the original recipe calls for coconut oil. I just prefer my pancakes cooks in butter for the flavor.
I also served mine with a small amount of butter, hot syrup, and freshly sliced strawberries. Any type of fresh berry would be delish.
Ingredients for pancakes:
1 cup cooked quinoa
1 cup almond flour, or meal
4 tbsp coconut oil
2 eggs
1/2 to 1 cup almond milk
4 tsp baking powder
2 tbsp maple syrup
1 tsp vanilla
1/2 tsp salt
Other ingredients:
Ghee
butter
maple syrup
fresh strawberries
Put all the pancake ingredients into a blender or vitamix and blend until smooth. Lightly grease a hot skillet and pour 1/4 cup of batter for each pancake. Cook until brown, a couple of minutes, and very gently flip to other side and cook for about 1 minute more. Plate and top with butter, hot syrup and berries.
If you have issues with sugar, or are diabetic, serve without the syrup.
Thursday, July 10, 2014
Chicken with Cherries
Once cherries came into season I wanted to make something with them besides a dessert. I tired this chicken with cherries recipe and was actually surprised that it came out so well. I am not usually one to combine savory and sweet in the same dish but I thought I'd give it a try and it worked. With cherries in abundance this time of year, they are inexpensive, so that means it is time to make this dish.
Serves 2.
2 tsp olive oil
2 chicken breasts
Salt and Pepper
I small shallot, chopped fine
1 or 2 garlic cloves, minced
1/4 cup chicken stock
1 tsp balsamic vinegar
1/2 cup pitted and halved cherries
The process here is that you are going to cook the chicken first, then remove it from the pan, and deglaze the pan to get all that chicken stuff on the bottom, all the while making the sauce for the chicken.
In saute pan add the olive oil, season the chicken with salt and pepper and saute until done. This will vary based on the size of the breasts. Remove from the pan and keep warm. To the pan add the shallots and garlic and saute for 1 minute, do not allow to burn. Add chicken stock to deglaze and scrape up all the brown bits. Cook and stir for a couple minutes. Add the balsamic, cherries and chicken and heat through. Remove from the heat and serve pouring the sauce over the chicken.
As you can see in the picture I served it with some spinach salad and some grilled veggies but any side dish would work. Have fun with it.
Monday, June 30, 2014
Roasted Tomatoes with Goat Cheese
As I often do, I see a recipe and then later think about it and try to make it based on what I remember. This is one of those. Because of this, I don't have exact measurements. I just get in the kitchen and throw the stuff together and either it works or it doesn't. This one worked. And it worked well. These tomatoes were absolutely delicious!
It's summertime and the first thing I look for are local organic tomatoes. I like the farmers market the best and I can't get enough of them. This recipe is a great way to eat more tomatoes but not in the traditional sense. If you are lucky enough to have a garden full of tomatoes I know you are always looking for ways to use them up. You will love this.
Use large tomatoes. Cut the top off and reserve. Using a spoon, dig out some of the flesh from the tomato. Make just enough space for however much goat cheese you want to put into it.
In a small bowl, mix some goat cheese with some minced garlic, finely chopped basil, salt and pepper, and an egg. Add a bit of olive oil to make a smooth filing. Spoon it into the tomatoes. Put the top back on them, drizzle on some olive oil and a sprinkle of salt.
Roast on a baking sheet in a hot 425 degree oven for about 35 minutes. The cooking time may vary depending on how many you are making. Serve warm.
As you can see from the picture we like to eat outside. A glass of wine, a good meal, outside in nature with my hubby and dog, and I am a happy woman. Enjoy!
Wednesday, June 4, 2014
Black Rice Salad
Black Rice, or Forbidden Rice, is a fairly new food item for most people. I've been playing around with it for the last couple years and have come to absolutely love the stuff. And don't you kind of have to love something called forbidden?
I am sorry to say that somehow I neglected to take a picture of the finished product.
Apparently the black rice contains a compound that helps with fatigue. I've been making it for breakfast as a warm porridge and I'm mad for it.
I made this salad recipe for a picnic and of course it was a big hit. My friend took her first couple of bites and said oh I must have this recipe. The best part is that you can make a bowl of it and it's good kept in the refrigerator for days.
I do love a meyer lemon but when I made this they were not in season so I used a regular lemon but I used a tangerine balsamic I happened to have instead of the white wine vinegar. It added to the slightly citrus note of the dressing. This shows that you can alter this recipe to use what you have or what you love. Go crazy!
Ingredients:
1 cup black rice
1/2 cup toasted walnuts, chopped
1/4 cup Meyer lemon juice or 3 Tbsp regular lemon juice
2 tbsp white wine vinegar
1 tbsp agave or honey
1/4 cup olive oil
4 scallions, thinly sliced
1 cup shelled edamame
1 cup grape tomatoes, halved
4 ounces haricot vert or green beans, cut into bite size pieces
Salt and Pepper
Cook the black rice according to package directions. Allow to cool.
If you edamame is uncooked put into a pot of boiling water and cook according to package directions. Allow to cool.
In the same pot add the green beans and blanch for 2 minutes. Remove and cool.
Make the dressing: in a small bowl combine the lemon juice, vinegar, agave and olive oil. Season with salt and pepper.
In a large mixing bowl add the rice, edamame, green beans, tomatoes, green onions, walnuts and toss with the dressing, mix well. Check for seasoning.
Chill and serve.
I am sorry to say that somehow I neglected to take a picture of the finished product.
Apparently the black rice contains a compound that helps with fatigue. I've been making it for breakfast as a warm porridge and I'm mad for it.
I made this salad recipe for a picnic and of course it was a big hit. My friend took her first couple of bites and said oh I must have this recipe. The best part is that you can make a bowl of it and it's good kept in the refrigerator for days.
I do love a meyer lemon but when I made this they were not in season so I used a regular lemon but I used a tangerine balsamic I happened to have instead of the white wine vinegar. It added to the slightly citrus note of the dressing. This shows that you can alter this recipe to use what you have or what you love. Go crazy!
Ingredients:
1 cup black rice
1/2 cup toasted walnuts, chopped
1/4 cup Meyer lemon juice or 3 Tbsp regular lemon juice
2 tbsp white wine vinegar
1 tbsp agave or honey
1/4 cup olive oil
4 scallions, thinly sliced
1 cup shelled edamame
1 cup grape tomatoes, halved
4 ounces haricot vert or green beans, cut into bite size pieces
Salt and Pepper
Cook the black rice according to package directions. Allow to cool.
If you edamame is uncooked put into a pot of boiling water and cook according to package directions. Allow to cool.
In the same pot add the green beans and blanch for 2 minutes. Remove and cool.
Make the dressing: in a small bowl combine the lemon juice, vinegar, agave and olive oil. Season with salt and pepper.
In a large mixing bowl add the rice, edamame, green beans, tomatoes, green onions, walnuts and toss with the dressing, mix well. Check for seasoning.
Chill and serve.
Friday, April 18, 2014
Trail Mix Cookies (gluten free option)
Apparently this recipe originally came from Miraval Resort and Spa in Arizona. I liked lots about the recipe but I did not want to use all purpose flour so I made a gluten free version. I decided to use almond flour and coconut flour for a couple of reasons. The recipe has nuts in it and the almond flour would pair nicely, but it can be a little heavy, so I lightened it up a bit by using coconut flour. Using two different flours also adds to the layers of flavor, which I am a big proponent of.
Another note about layers of flavor. I used three different sweeteners in this recipe. The flavor profile is so much more interesting this way.
If you want to make these the original way simply use 1 cup of all purpose flour in place of the almond and coconut flours.
Ingredients:
4 Tbsp butter, room temp
1/2 cup brown sugar
1/4 cup coconut palm sugar
1/4 cup agave nectar, or honey
2 egg whites
3/4 cup almond flour
1/2 tsp baking soda
1/4 tsp salt
2 cups rolled oats
1/2 cup combo of pumpkin and sesame seeds
1/2 dried cherries
1/4 cup cacao nibs
Preheat the oven to 350 degrees. Line a cookie sheet with parchment paper.
In a stand mixer with a paddle attachment cream the butter, brown sugar, and coconut palm sugar until smooth. Add the agave and egg whites and blend another minute.
In a separate bowl combine the almond flour, coconut flour, baking soda, salt and rolled oats.
Add the dry ingredients to the mixer and mix until just combined. Remove from stand, then stir in the seeds, fruit and cacao nibs until well mixed.
Use a 1 tablespoon scoop and place on cookie sheet with 1 inch in between cookies. These cookies can tend to crumble easily so make sure they are formed together well before baking and that they are flat. Bake for approximately 10 minutes. Remove from the oven and allow to cool on the sheet for another 10 minutes, then remove to a cooling rack or wax paper. Allow to cool completely. If you try to eat them before they are completely cool and have firmed up they will fall apart. I found this out the hard way :) because sometimes I just can't wait!
These are perfect to have around for the week, or to pack into a lunch, and to take on a road trip. And I don't feel guilty when I eat one!
Saturday, March 22, 2014
Broccoli Rabe Pesto with Turkey Meatballs
Healthy and satisfying. That's how I would describe this dish. It's easy and it has all the components, noodles, veggies, and meat. My husband loved this because he loves broccoli and he doesn't get it very often.
Buying frozen turkey meatballs and keeping them in the freezer makes it easy to whip up a quick meal on busy nights. I buy mine at either Trader Joe's or Mother's Market. Make sure they are all natural and don't contain and bunch of artificial ingredients.
I used soba noodles for this dish, which is buckwheat, but you could certainly use a whole wheat pasta.
Ingredients:
1 bunch broccoli rabe
1/3 cup pine nuts, toasted
1/3 cup Parmesan, freshly grated
1/4 tsp red pepper flakes
3 garlic cloves
Salt and Pepper
1/3 olive oil
1 package turkey meatballs
1 lb Soba noodles
Bring a large pot of water to the boil. Blanch the broccoli rabe for a couple of minutes. Remove and drain well, reserving the water to cook the soba noodles. Chop coarsely and add to a food processor. To the processor add the pine nuts, Parmesan, red pepper flakes, garlic, salt and pepper, and pulse until it's a large mince. Add the olive oil and pulse for a second. I like to leave a little bit of chunk to the pesto and not blend it until smooth but you can make it however you like it.
In a large skillet, heat a tablespoon of olive oil. If you bought fully cooked meatballs heat through for a few minutes. If you bought raw, cook them according to package directions. Then add the pesto and heat through.
Meanwhile cook the soba noodles in the reserved pot of water according to the package directions. Reserve 1/2 cup of the water. When the soba noodles are done add to the skillet and toss all ingredients together. If needed add a little of the reserved water to loosen up the sauce. Serve warm garnished with a little more grated Parmesan.
Monday, March 17, 2014
Breakfast Black Rice
Focusing on nutrition means I'm constantly looking for ideas, especially for breakfast. I recently became addicted to black rice so making it for breakfast seemed like a great idea. I make this and have it in the refrigerator for several days. I simply take out a portion, heat it up, and it's ready to eat.
Black rice contains magnesium, iron, potassium, and zinc. It is packed with protein and is slow to release to help with energy. It is also high in amino acids and antioxidants. This is why it is thought to be helpful with fatigue.
1 cup black rice
1 can full fat coconut milk
1 1/2 cups water
1/4 tsp sea salt
1/2 vanilla bean, split
1 Tbsp maple syrup, or coconut palm sugar
1/3 cup coconut flakes, toasted
Almond milk to serve
Fresh fruit
Nuts
Rinse the rice well and drain.
In a medium saucepan combine and water, coconut milk, salt, vanilla bean and rice. Bring to a boil, then reduce to a very low simmer, with the lid ajar, and cook for 45 minutes or until the rice is fully cooked. Remove the vanilla bean. Add the maple syrup to combine. You could use coconut palm sugar in place of maple syrup.
Toast the coconut in the oven, or toaster oven, until only slightly brown. Add a sprinkling of it over the bowl of rice, pour on a little almond milk. I might also add some fresh fruit if I have it, like strawberries, and some nuts. I especially like pumpkin seeds.
If you want to bump it up some make some homemade almond milk for this. I recently tried it and gosh it was so good.
Wednesday, March 12, 2014
Madeleines with Lavendar Honey
Madeleine's. Those cute little French cookies that are soft and fragrant and perfect with tea. I've always loved them but haven't spent much time perfecting the making of them. Until I decided to play around with Lavender. I bought food grade lavender one day and decided I was going to make these cookies and a lavender ice cream. I have yet to try the ice cream but it's on my to do list for this summer.
Now lavender can be tricky. It's rather strong to me so I would go easy on it in this recipe. If you absolutely love it however, feel free to let yourself go nuts. I buy lavender essential oil and use it in my bath, and on a heat wrap for my neck. It's also great for rubbing on the temples if you have a headache. But cooking with it seems a bit more risky.
Now I don't know about you but I don't keep lavender honey in my pantry so I had to make my own. I buy a good local honey from my local farmers market so I just added a small tsp of lavender to a tablespoon of honey. I let it sit in a bowl for a couple of days to, hopefully, extract more of the flavor. Depending on your lavender, you can crush it up very fine, which I would suggest so you don't get those bits in the finished product.
You will need a Madeleine pan for this recipe. You can find them at kitchen supply stores. I've had one for years because I always thought I would make these on a regular basis. Ha! Who was I kidding?
Ingredients:
9 Tbsp butter
4 large egg whites
1 1/3 cups powdered sugar
6 Tbsp all purpose flour
1/4 cup almond flour
1 Tbsp lavender honey
Preheat the oven to 350 degrees.
Butter and flour the pan. Tap out any excess flour.
Your almond flour needs to be fine. I usually buy almond meal because it is readily available to me but then I put it in my vitamix, or food processor, and grind it so that it is more of a flour. This will create a lighter cookie.
Melt the butter in a small skillet until it starts to turn brown, about 5 minutes. Set aside.
Using an electric mixer beat the egg whites briefly then add the sugar, white flour, and almond flour and mix until smooth and well blended. Place the honey in the microwave and heat for 5 to 10 seconds then pour into the batter. Add the brown butter and beat to blend.
Spoon 1 tablespoon of the batter into each Madeleine mold.
Bake until tops are dry and tester comes out clean, about 13 minutes. Allow to cool 5 minutes in the pan, then tap out, and allow to cool completely. I have a pan that is larger than most so I filled mine with more batter and increased the baking time to 16 minutes.
Once they are completely cool you can dust them with powdered sugar.
To make additional cookies you will need to completely wash and dry the pan then butter and flour again. It's no fun when the cookies stick!
Sunday, March 9, 2014
Squash Carbonara with Pancetta and Sage
I have to say I don't make pasta much anymore but this one was calling my name. I try not to eat gluten very often so I made this with pasta made from quinoa. There are lots of options available these days so choose a pasta that works for your family.
Secondly anything made with winter squash interests me. Using it to make a sauce for pasta seemed like a healthy idea. This is creamy without cream, it's only squash and broth.
Prepare all your ingredients. Wash and chop everything so that you are ready to cook without interruption. This process is called mise en place. Its the process of organizing and arranging ingredients in the kitchen for the cook. Its much easier to cook a recipe when you have everything at ready, in front of you. I didn't always practice this, and I'd get in the middle of a recipe and then have to stop to chop something and it was much for difficult, and often frustrating, to get something prepared. Once I took cooking classes this was required and I quickly learned how beneficial it was, so now I do it every time. It saves time and my sanity in the kitchen. My husband is great at this. He's my sous chef and he's always up for what we call "slicing and dicing" to help get the ingredients ready.
Both kabocha and butternut squash are perfect for purees, they cook up soft and smooth, so choose the one you prefer or can find easily.
Ingredients:
2 Tbsp olive oil
4 oz pancetta or bacon, chopped small
1 Tbsp fresh sage, finely minced
3 cups kabocha or butternut squash, cut into 1/2 inch pieces
1 small onion, chopped
2 cloves garlic, minced
Sea Salt
Freshly cracked Pepper
2 cups chicken stock
12 ounces fettucine or linguine
1/4 cup pecorino, finely grated
Add the squash and onion to the skillet, salt and pepper, and cook until slightly brown about 8 to 10 minutes. Add the garlic and cook for one minute more. Then add the stock and bring to a boil. Reduce the heat and allow to cook and reduce about 15 to 20 minutes until the squash is soft. Allow to cool slightly, then puree. Add the puree back to the skillet and add in the pancetta back in. Taste and adjust seasoning if needed.
Cook pasta according to package directions until al dente. Reserve one cup of pasta water. Add the pasta to the skillet with the squash, add a little pasta water at a time until you get a nicely coated pasta. Add the grated pecorino and toss well.
To serve, mound in a bowl or plate, grind a little freshly cracked pepper over it and slice a few pieces of pecorino on top using a vegetable peeler.
Note: I found that I had more squash then I needed so the next time I make this I might remove a little of the squash and keep it for another meal. This squash is very rich so you need to determine how much of it you want on your pasta. I prefer mine a little lighter, but you may like using it all so experiment.
This puree would also be good to use in a risotto or as a sauce for grilled foods.
Friday, February 28, 2014
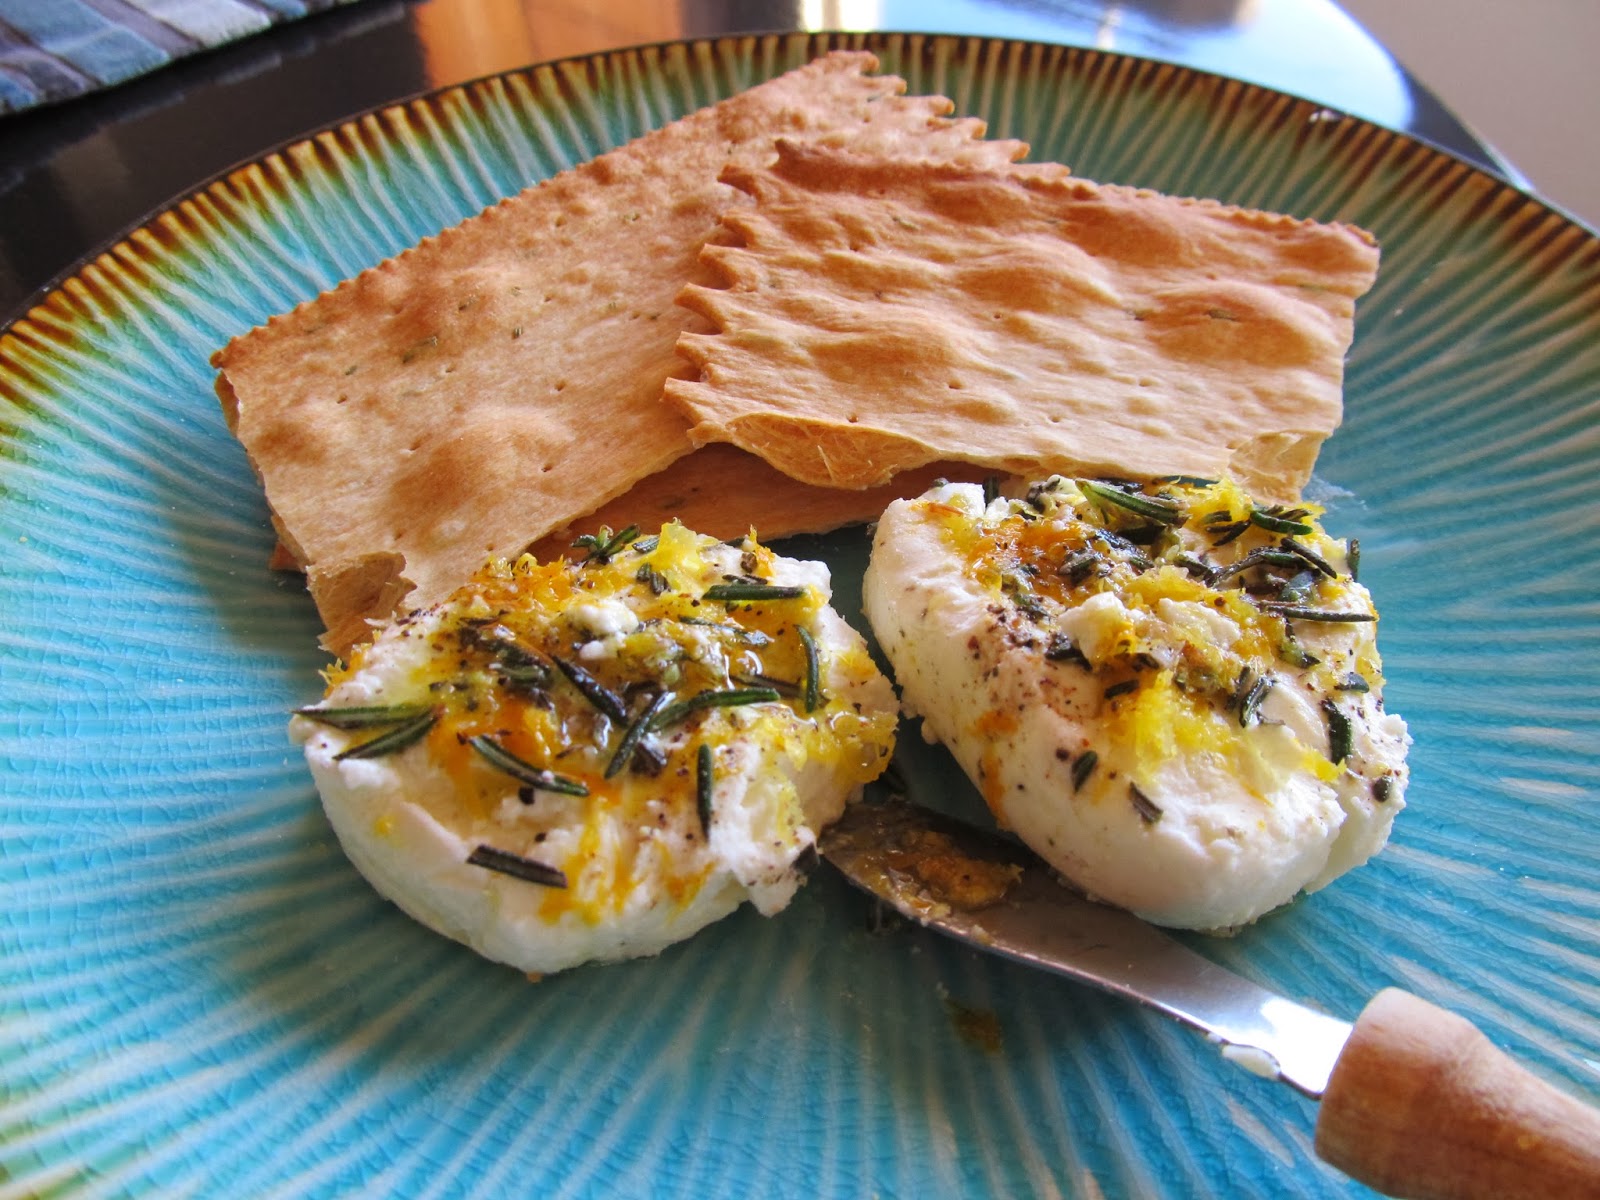
Goat Cheese with Lemon and Rosemary
We were on a picnic in wine country and a friend brought this goat cheese with some crackers for our lunch. The recipe sounds so simple, but man is it good. We couldn't get enough of it, and we were glad when we got have it a few days in a row. As soon as I got home I knew I had to make it.
Ingredients:
1 log of goat cheese
Olive Oil
1 lemon
1 tsp fresh rosemary, minced
Grey salt or other large grain salt like Maldon
Pepper
Make sure the log of goat cheese is well chilled so it is firm. Cut into 1/2 inch rounds. Lay out flat, drizzle with olive oil, sprinkle with lemon zest, sprinkle with rosemary, then grey salt, then freshly ground pepper.
I have some lemon olive oil that is excellent on this. With the lemon olive oil and the lemon zest it is superb!
This can be stored in an air tight container in the refrig for a week.
You can use this to put on bread or crackers, or use it on top of a salad, which is one of my favorite ways to eat it. Plus your guests will be impressed and love it.
Ingredients:
1 log of goat cheese
Olive Oil
1 lemon
1 tsp fresh rosemary, minced
Grey salt or other large grain salt like Maldon
Pepper
Make sure the log of goat cheese is well chilled so it is firm. Cut into 1/2 inch rounds. Lay out flat, drizzle with olive oil, sprinkle with lemon zest, sprinkle with rosemary, then grey salt, then freshly ground pepper.
I have some lemon olive oil that is excellent on this. With the lemon olive oil and the lemon zest it is superb!
This can be stored in an air tight container in the refrig for a week.
You can use this to put on bread or crackers, or use it on top of a salad, which is one of my favorite ways to eat it. Plus your guests will be impressed and love it.
Sunday, January 5, 2014
Posole
With my husband's family being from Mexico there are a few dishes I've had to learn to make over the years. I don't usually try and cook Mexican food at home because his Mother made the best dishes and there is no way in heck I can compete with that. So I keep it to only a couple of traditional dishes each year. One is Posole. There are not a lot of ingredients in Posole so its important to build flavor as you go along in the recipe. I do a couple of things in my recipe that the other family members don't do, and I think it makes all the difference. My husband agrees.
I use my vitamix to puree the chili's because I can get a smooth sauce. If you don't have a vitamix use a blender or a food processor.
I use the full amount of chili in my recipe because we like a little heat. If you don't want the heat use the smaller amount.
Meat:
3 lbs pork butt
1 1/2 lbs pork neck bones
1 white onion, cut into 4 pieces
4 whole garlic cloves
1 Tbsp whole peppercorns
4 bay leaves
1 Tbsp cumin seeds
1 tsp salt
In a large stock pot add the meat cut into small chucks about 3 inches. Add the neck bones and cover it all with water. Add onion, garlic, peppercorns, bay leaves, cumin seeds, salt. Bring to a boil, then reduce to a low simmer. Skim off any foam. Allow to cook at about 1 1/2 hours until the meat in tender and falling off the bone.
Chili sauce:
5 dried ancho chili's
Hot water
4 garlic cloves
Separate 5 dried ancho chili's by removing the stem, and separating the seeds from the chili. In a bowl tear the chili up into small pieces and cover with a couple of cups of hot water. Allow to sit and soften for 20 to 30 minutes. When soft put into the vitamix, add 4 cloves of garlic, and puree until smooth. Set aside.
Put the chili seeds into a small skillet and dry roast for a couple of minutes. Do not burn. Dry roasting simply brings out a little more of the flavor of the seed. Put the toasted seeds into the vitamix and add a little of the meat broth, puree until smooth. Set aside.
To build the soup:
2 Tbsp canola oil
1 white onion, finely chopped
2 tsp chili powder
1/4 to 1/2 tsp chipotle powder
1/4 to 1/2 tsp Ancho chili powder
1/4 to 1/2 tsp cayenne powder
2 tsp ground cumin
2 Tbsp oregano
1 6 pound can hominy, drained
3 cloves garlic, minced
2 tsp salt
In a large stock pot heat some canola oil, and the onion chopped fine.
Cook on low heat until translucent. Add the chili sauce and the seed sauce, stir well. Add the chili powders (see below) and cook it all for about 10 minutes.
For the chili powders measure all into a small skillet and toast slightly. This will bring out some of the flavor, especially if your spices have been sitting around for awhile. Add the toasted chili powders to the pot with the chili sauce.
To the stock pot add the cumin and oregano, hominy, the minced garlic, the meat, oregano, salt.
Remove the meat from the broth and allow it cool so you can handle it. Shred the meat and remove any bones or fat. Strain the broth, then add the broth to the stock pot. Cook on a low simmer for about an hour. If there is not enough broth add some chicken stock until you get the desired amount of liquid.
I then turn it off and I allow it to sit covered for a couple of hours to develop the flavors even more. When I'm ready to serve it I reheat it.
As your making the soup you must taste and adjust seasoning. You may need more salt. It it's not spicy enough for you add some more chili. We like ours flavorful but not hot.
Serve with the following garnishes:
White onion, minced
Dried oregano
Cabbage, diced
Lime wedges
Radishes, sliced
Friday, December 27, 2013
Pasta with Salmon and Peas
This pasta came out of one of those nights when I was searching the kitchen for something to cook so I would not have to go to the store. You know how that goes, we've all had them. I would have eaten just about anything because I was in my pj's and was NOT going to get dressed no matter what.
I found a really sad piece of salmon in the freezer, along with some peas, and a box of gluten free pasta in the pantry. I figured I could make something happen with that. I mean if you have pasta in the house you have a meal.
The surprising thing is that it turned out so good my husband kept asking me if I wrote down the recipe. Of course I had not, but figured I better do so right away before I forget what I did. Now it is one of our favorite quick night meals.
Ingredients:
Shallots
Stock
Butter
Cream
Salt and Pepper
Peas
Salmon
Cheese
Pasta (use regular or gluten free)
Cook the salmon in a saute pan for a couple minutes per side, then set aside to cool. Break up into bite size pieces.
Cook the pasta while you are making the sauce.
In the same saute pan you cooked the salmon in cook the minced shallots, then add some chicken or vegetable stock, reduce slightly, add some butter and cream and continue to cook for a few minutes. Add the peas and cook until just heated through. Season with salt and pepper, add the salmon. Add the pasta to the pan and toss gently. Add some cheese and serve.
Saturday, November 30, 2013
Stuffed Artichokes
After making these I don't know that I will ever make artichokes any other way again. I loved these. Even if I don't use the same filling, cooking them this way makes it much easier and faster. I usually cook the whole artichoke in a pot of boiling water and it takes forever. Figuring out when they are done is also difficult so I tend to overcook them and then they fall apart. Cooking them this way allows you to tell very easily when they are done.
Ingredients:
Salt
2 large artichokes
1 large lemon
2 tbsp butter
3 tbsp olive oil
3 cloves garlic, minced
2 tbsp anchovy paste
1/2 cup black olives, pitted and coarsely chopped
2 tbsp capers, drained and chopped
1/4 to 1/2 cup freshly grated Parmesan cheese
Bring a large pot of salted water to the boil.
Cut the lemon in half. Cut the artichokes in half lengthwise and using a paring knife remove the chokes. Trim the ends of the leaves with scissors to remove the spikes. Rub the cut sides with lemon. Add the lemon juice and the lemons to the pot of water, add the artichokes. Cover and cook for 15 to 20 minutes until the artichokes are tender. You can test for this by using the tip of the paring knife. Allow to drain completely in a colander.
In a heavy skillet heat the butter and olive oil. Add the garlic and anchovy paste and stir, then add the artichokes face down. Cook for 5 to 6 minutes to get a slight brown on them. Turn over and cook another 4 minutes.
Preheat the broiler.
Arrange artichokes cut side up in the skillet and fill.
To make the filling: in a small bowl mix together the black olives, capers, breadcrumbs and cheese.
Cook under the broiler only a couple minutes to get a nice brown crust on them. Serve immediately.
I make my own breadcrumbs. I always keep good quality multigrain bread in my freezer. I remove a couple of pieces and allow them to defrost. Then I remove the crust, cut them up into small pieces and put them in the food processor and pulse until I get the desired crumb.
Friday, November 22, 2013
Fall Salad with Escarole, Apples and Blue Cheese
When the weather changes and we all want comfort food it's nice to know that we can still have a salad, only one that now incorporates the flavors of Fall. I recently made this salad for a dinner party and I was quite happy with it.
It's made with Pink Lady apples which are so nice and light and crisp this time of year. And they look great in the salad, all green and pink. Find a blue cheese that you like, any variety will do. I like the Point Reyes but can't always find it so I get what I can. I like a nice variety of greens, it makes the salad more interesting to get different flavors and textures.
Ingredients:
Various greens: Escarole, curly endive, baby greens
Pecans, Toasted and chopped
Celery, sliced very thin
Pink Lady Apples, sliced very thin
Point Reyes Blue Cheese
Dressing:
3 tbsp apple cider vinegar
1 tbsp shallot, minced
1 tsp Dijon mustard
1 tsp sugar
1/4 cup canola or grapeseed oil
2 tbsp olive oil
Salt and Pepper
To make the dressing: in a small bowl combine the vinegar, shallot, mustard and sugar. Whisk and allow to sit for 10 miutes. Whisk in the two oils and salt and pepper to taste. Done.
Make sure your lettuces are well chilled and crisp.
Toast the pecans. Break up the blue cheese into small crumbles. Slice the celery and apple.
Put greens into a large salad bowl, add the nuts, apple and celery. Dress and toss. Plate and then top each with some of the blue cheese.
Thursday, October 31, 2013
Maple Glazed Carrots
When I make vegetables I tend to keep it simple. However, that can get boring, so occasionally I like to find a recipe that is special. I especially like this during the holidays when I tend to cook a little more creatively. Carrots are a nice side dish and if you add in same mustard and maple syrup this makes for an extra special dish.
You can use the nice sweet little baby carrots whole, or simply use the large ones and slice them in half long ways so they don't take forever to cook.
These also look nice when you serve them.
Ingredients:
2 Tbsp olive oil
2 lbs carrots
1/3 cup pure maple syrup
2 tsp Dijon mustard
1 cup water
salt and pepper
1 tbsp fresh tarragon, chopped
In a large skillet or dutch oven heat the olive oil over medium heat, add the carrots and saute for 5 to 7 minutes until they just start to get brown. Add the syrup, mustard, water, and salt and pepper. Cover and reduce and simmer for about 10 minutes or until carrots are tender. If carrots cook too quickly remove them from the pan, then allow the sauce to continue to reduce until you get the desired consistency. The sauce should be syrupy. If desired, sprinkle chopped tarragon over when plating.
Thursday, October 10, 2013
Baked Penne with Butternut Squash and Four Cheeses
Can you say comfort food? While this recipe uses penne pasta it's kind of like mac and cheese when you think about it. Designer mac and cheese.
There are a few layers to this dish. You roast the squash, make the bread crumbs, make the cheese sauce, then put it all together. It does take a little time, as all good things do. You can use gluten free pasta if you like, or whole wheat, whatever your preference.
This is great for a pot luck, or if you're having family over. You can make one large pan full, or make it in small pans so that you have leftovers to freeze. I use 3 gratin pans when I make it so I have one for now, one for a few days later, and one to freeze. Or one to give to a friend.
About the cheese. The amounts below are approximate. Don't sweat the exact amounts. Any combination of cheeses is going to taste great.
Ingredients:
1 pound butternut squash
2 tbsp olive oil
1 tbsp fresh sage, chopped
1 pound penne pasta
Sea Salt
Pepper, freshly ground
Cheese sauce:
3 tbsp unsalted butter
3 tbsp flour
2 cups organic heavy whipping cream
2 cups water
1 1/2 cups fontina cheese, grated
3/4 cup blue cheese
1/2 cup Pecorino
3/4 cup Parmesan
Pinch of nutmeg
Salt and pepper
Topping:
3 slices bread
1/2 cup Parmesan
1 tbsp sage, chopped
2 tbsp butter, melted
Salt and pepper
Preheat the oven to 400 degrees.
Peel the squash, then cut into approximately 1 inch cubes. Place the cubed squash in a bowl. Add olive oil, salt and pepper, sage and toss well to coat. Place on a baking sheet. Roast in the oven for 20 to 30 minutes. The squash should be soft and cooked through.
To make the topping: cut off the crusts of the bread, then cut bread into cubes. Put in a food processor and pulse until fine. Transfer to a bowl. Add the melted butter, salt and pepper, Parmesan and sage. Set aside.
To make the cheese sauce: Pour the cream into a container and add 2 cups of water to it and mix. In a medium saucepan melt the butter over low heat. Add the flour, stirring constantly, making a rue. Cook 3 to 4 minutes then slowly start adding the cream and whisking to prevent any lumps. Slowly turn the heat up and allow to cook for about 10 to 15 minutes then add the cheeses, nutmeg, salt and pepper. Remove from the heat.
In the meantime cook the pasta according to package directions.
Mix together the pasta, butternut squash, and cheese sauce. Pour into a 9 x 13 baking dish, sprinkle the bread crumb topping over the top.
Bake for 30 minutes.
There are a few layers to this dish. You roast the squash, make the bread crumbs, make the cheese sauce, then put it all together. It does take a little time, as all good things do. You can use gluten free pasta if you like, or whole wheat, whatever your preference.
This is great for a pot luck, or if you're having family over. You can make one large pan full, or make it in small pans so that you have leftovers to freeze. I use 3 gratin pans when I make it so I have one for now, one for a few days later, and one to freeze. Or one to give to a friend.
About the cheese. The amounts below are approximate. Don't sweat the exact amounts. Any combination of cheeses is going to taste great.
Ingredients:
1 pound butternut squash
2 tbsp olive oil
1 tbsp fresh sage, chopped
1 pound penne pasta
Sea Salt
Pepper, freshly ground
Cheese sauce:
3 tbsp unsalted butter
3 tbsp flour
2 cups organic heavy whipping cream
2 cups water
1 1/2 cups fontina cheese, grated
3/4 cup blue cheese
1/2 cup Pecorino
3/4 cup Parmesan
Pinch of nutmeg
Salt and pepper
Topping:
3 slices bread
1/2 cup Parmesan
1 tbsp sage, chopped
2 tbsp butter, melted
Salt and pepper
Preheat the oven to 400 degrees.
Peel the squash, then cut into approximately 1 inch cubes. Place the cubed squash in a bowl. Add olive oil, salt and pepper, sage and toss well to coat. Place on a baking sheet. Roast in the oven for 20 to 30 minutes. The squash should be soft and cooked through.
To make the topping: cut off the crusts of the bread, then cut bread into cubes. Put in a food processor and pulse until fine. Transfer to a bowl. Add the melted butter, salt and pepper, Parmesan and sage. Set aside.
To make the cheese sauce: Pour the cream into a container and add 2 cups of water to it and mix. In a medium saucepan melt the butter over low heat. Add the flour, stirring constantly, making a rue. Cook 3 to 4 minutes then slowly start adding the cream and whisking to prevent any lumps. Slowly turn the heat up and allow to cook for about 10 to 15 minutes then add the cheeses, nutmeg, salt and pepper. Remove from the heat.
In the meantime cook the pasta according to package directions.
Mix together the pasta, butternut squash, and cheese sauce. Pour into a 9 x 13 baking dish, sprinkle the bread crumb topping over the top.
Bake for 30 minutes.
Wednesday, September 18, 2013
Marinated Olives
It's nice to have olives on hand for quick entertaining. We make a lot of appetizers in our house and olives are always part of the offering. It's easy to buy olives in the store and then bring them home and make them extra special. I marinade them in a few ingredients and after a few days or even a week they are really wonderful.
Ingredients:
olives and juice
1 large bay leaf
fresh rosemary sprig
2 whole garlic cloves
Orange rind, or lemon
olive oil
Make sure you use a clean sterilized jar to store the olives in.
Into the jar put the bay leaf, rosemary, garlic and the citrus rind. Next fill the jar with olives. Now you can use either the juice the olives came in or olive oil. Fill to the top of the jar to cover the olives.
Allow to sit, refrigerated, for several days. These will keep in the fridge for a few months. I take out only what I am going to serve, then put the jar back in the frig until next time. I remove only the olives and leave the other ingredients in the jar until the jar is empty.
There is another way to make olives special which is extra special. You can put all these ingredients into a small saucepan and heat it just until hot, then put into a serving bowl, allow to cook slightly, and serve warm. They are really good served like that and you don't have to make them ahead of time.
Tuesday, August 20, 2013
Pollo Alla Diavola
Pollo Alla Diavola translates to devilish chicken. Alla Diavola refers to using chili's in the recipe as it's supposed to be hot and spicy like most Latin things are. However, I have to say that we were quite surprised that this dish was not really hot. It had an excellent flavor but no real heat, so don't be afraid to make it if you are not a fan of hot food. The chili sauce added great flavor, and it was moist and juicy.
This dish was inspired by Bobby Flay's show BBQ Addiction on Food Network. It is our new favorite show. I have never seen my husband watch a cooking show and be so focused. He even rewinds the DVR sometimes if he has to see something over again. He is totally channeling Bobby these days and I am the lucky recipient of his work.
For this recipe you need a whole chicken. There are only two of us and I always experience a little sticker shock when I buy a whole organic chicken. I don't usually spend $18 on meat for one meal. But then I realized that this chicken would feed us for more than one meal. As it turns out we got three meals out of this one, so that's only $6 a meal. I'm sold.
Pick any combination of dried chili's you like. We had a few different kinds in the pantry so we used all three. We used an ancho and a generic California chili because they provide that deep depth of flavor but they are not hot. Then we added a couple of the tiny little red Asian chili's that for the heat. We used only half of this chili oil for the whole chicken we grilled and kept the other half in a glass jar in the refrigerator. A week later we made chicken again and used the rest of the oil.
1 whole organic chicken, butterflied
3/4 cup olive oil
1 tsp dried oregano
1 tsp salt
4 to 6 black peppercorns
4 or 5 dried chili's
3 large garlic cloves
In a small dry saute pan heat the chili's for a few minutes to bring out the flavor. Add the peppercorns, garlic, oregano and 1/2 cup of the olive oil.
Heat on low simmer for about 5 minutes until the oils release and the air is fragrant Turn off heat and allow to sit for 15 minutes. Pour into a food processor or blender, add the salt and puree until smooth. If needed you can add an additional 1/4 cup of olive oil. Pour into a glass jar for storage.
Butterfly the chicken by cutting out the backbone. We used a pair of kitchen shears which made it a pretty easy process. Then press it down flat to help it cook evenly. There are videos on line if you want to watch a how to.
With a pastry brush brush on the chili oil all over the chicken. Allow to marinate for at least 30 minutes. Put chicken on the grill and cook for approximately 10 minutes on direct heat, skin side down. You want a nice brown crisp skin. Flip it over and cook approximately another 30 minutes on indirect heat. Try to maintain the temperature at 400 degrees. Check the internal temperature until it comes to 160 degrees Remove and allow to rest for 10 minutes before carving.
Thursday, August 15, 2013
Black bean and mango salad
I am not a big meat eater so I am always looking for way of getting more protein into my diet. I love black beans so this seemed like a natural. This is a simple salad that can be made ahead and kept in the refrig for a day or so. It's great for a picnic or as part of a buffet.
Ingredients:
2 c black beans, or 1 14 oz can
1 mango, diced into 1/2 pieces
1/2 small red onion, small dice
Juice and zest of one lime
1/2 cilantro, chopped
Rinse and drain the beans. Put them into a bowl, add the rest of the ingredients and toss. Chill for at least 30 minutes or longer if desired. The flavors will marry as it sits and become more complex.
Easy peasy. Enjoy!
Subscribe to:
Posts (Atom)