Monday, August 31, 2009

Making Ricotta Cheese


Yes I said making ricotta cheese.


I'm on a cheese kick. Gotta do it. It's new, its exciting, and full of surprises. It makes me giddy to think about making my own cheese.

I don't know how I actually got on this kick. It has interested me for some time. I would walk into cheese shops and think about making cheese and how satisfying it must be. But it is so easy drive to a store and buy good cheese that the thought of making it might seem a little stupid. Eventually the bug got the better of me and I just had to give it a try. I bought a home cheese making book and sat down and read it cover to cover which only proved to get me even more excited about the prospect of eating cheese that I would make.
In my very short cheese making career here is what I have learned so far. It's a simple act of taking milk and heating it that produces cheese. Seems simple. It is simple in concept. Au contraire. Cheese making is not easy. It is a complicated chemical process, and one misstep can ruin a batch of cheese. You end up with something else entirely, and sometimes it is hard to tell what it is.

But this cheese making event was a success so lets get to the details.


Ingredients and equipment:
  • 1 gallon whole milk
  • 4 cups cultured buttermilk
  • Salt
  • Large heavy bottomed stock pot
  • Thermometer
  • Butter muslin or cheesecloth
Put the milk in a large heavy pot and heat it slowly until it reaches 180 degrees, stirring occasionally. This will probably take 35 to 40 minutes, but the temperature is the important item here. Once it has reached 180 remove the pot from the heat and let it sit for 30 minutes. This will allow the curbs to form, see below. Do not stir at this point.


Line a colander with a double layer of butter muslin. Pour the curds into the colander carefully and allow to drain for anywhere from 30 minutes to 2 hours. The longer it drains and dryer the cheese will be. You decide. It all depends on how wet or dry you want it.


When the ricotta has drained to your satisfaction transfer it to a bowl, break it up, and stir. Add salt to taste. The cheese can be kept in the refrigerator up to on week but I would recommend using it as soon as possible.


There are number of different ways to serve and enjoy this cheese. You can add a variety of fresh chopped herbs to it then serve it on crackers. You could add some sun dried tomatoes. I like to make crostini, put the goat cheese on top, then top with some of the sun dried tomatoes and olive oil. Or you can make lasagna or add it to an omelet.


One thing is for sure. The taste is so much better than stuff you buy in the containers at the supermarket. Now I know that making cheese is not such a stupid idea.

Sunday, August 16, 2009

CSA Food Basket - week one


This week I drove down to the farm and picked up my first food basket, as they call them. Holy moly! The thing was so heavy I could barely lift it into my car. It smelled wonderful....like dirt and like being on the farm. I wanted to just sit in my car for hours and get high off the fumes. And my dog Pepper was diggin' it too.
I made a point of unpacking it item by item onto my kitchen counter. I looked at each piece, smelled it, thought about what I could do with it, and examined it like it was some kind of jewel. I was in awe. You will be surprised how much stuff I got. Here is the list:

1 bunch celery

4 heads lettuce

1 bunch swiss chard

1 bunch lacto kale

1 bunch parsley

3 heads broccoli

2 summer squash

3 pickling cucumbers

4 regular cucumbers

1 bunch carrots

4 oranges

1 grapefruit

4 plums

3 red bell peppers

3 yellow starburst squash

1 melon

3 large tomatoes

9 roma tomatoes

I knew it was going to be generous but, seriously, I had no idea there would be that much stuff. After I got over how beautiful it all was I set about putting it away. Most I could leave out on the counter as long as I used them fairly soon but I did have to wash the lettuces right away and get them bagged and into the frig to chill. I admit I have not done that in awhile. I have been lazy and buying lettuce in a bag. But now I actually had to wash the dirt off of it, spin it dry and store it somehow. Heck this is work.

The key is to plan what you need to eat first. The lettuces and kale would get used first because the carrots and squash could spend a few days in the refrig. And I knew we would eat the fruit for breakfast or lunch so that was not a problem.

Now what is interesting is that my husband does not eat cucumbers, he says they don't agree with him. Did I say we received four of them? What the heck am I supposed to do with them? The folks at South Coast Farms sent me a recipe that I decided to try. You slice the cuc's, salt them and let them sit for 15 to 30 minutes, wash and dry them, then mix together vinegar and sugar and marinate them in that for awhile. I was astounded at how good it was. Seems terribly simple to be so good. And my husband liked them! Wahoo. With the rest of them I made a salad with cuc's, garbanzo beans, tomatoes and some Italian dressing. Then I will make a gazpacho and we should be done with them.

And I have 3 pickling cucumbers. What does one do with only three of these? Am I supposed to make some pickling brine just for the three? I think out of everything in the batch these will be the most challenging.

The chard and kale I sauteed in olive oil with some garlic, a small pinch of red pepper flakes, and some salt. I topped that with white beans and diced tomatoes and drizzled it all with olive oil. We were feeling quite healthy.

The green summer squash I used one night in a big salad. I cooked it quickly in a grill pan with olive oil, garlic, salt and pepper. I also used one head of the broccoli, some of the tomatoes and the carrots in addition to a piece of salmon and made a big tasty salad as an entree for dinner.


The broccoli was a challenge for me. I am not a fan broccoli but my husband is. He was so happy it was in the house but I was trying to figure out what I could do with it to reduce that bitter broccoli taste. I had three heads. The first one I simply streamed and hit it with some salt and Al ate it all up. I had a couple bites and thought oh yeah this is as bad as I remember it. So the next time I made a pasta dish. I blanched the broccoli and set it aside. In a large saucepan I added some olive oil, garlic, and pinch of red pepper flakes. Let that saute for only a few seconds then get the broccoli in and the pasta and start tossing. Add a little pasta water or stock to make a bit of a sauce. Serve it in big pasta bowls with a grating of Parmesan. Now this broccoli I could eat.


The third head I pickled. Haven't tasted it yet. I have been reading some food blogs about pickling and was getting kinda curious about it all so what the hell....lets pickle some broccoli. I will taste in a couple of weeks and let you know how it is.


The red bell peppers where a bit disappointing. They had a bitter taste. I made pasta in peppers, sauteing the peppers in olive oil and butter with some garlic, then adding some heavy cream and simmering for a few minutes to turn into a thick rich sauce. Lots of fresh basil over the top with some cheese. I have made this dish numerous times throughout the years and it is always satisfying. But this time it had a slight bitter taste of the peppers. I was not real happy with them. The peppers have to be sweet.


The yellow squash in going on the grill tonight with the beautiful organic roast chicken my husband has on the rotisserie. We have owned that grill for years now and have never used the rotisserie. Did it take getting all this produce to make us finally use the thing? Whatever it was we are like excited children at the prospect.

Monday, August 10, 2009

CSA - My new love


I am in love. Ah isn't that sweet? I've been waiting and searching and now it has happened. A beautiful CSA right in my own back yard. I am thrilled and filled with anticipation.

I recently found an organic farm in Orange County that not only grows organically, operates a produce stand, but also has a CSA, which stands for Community Sponsored Agriculture. I have always been curious about the CSA's and wondered what it would be like to be lucky enough to join one. The entire concept is rewarding but living in the city usually limits access to things like this. Getting some organic growers at the farmers market took years and I was thrilled with just that.

The key points about this CSA are that the food is locally grown. The food I will get in my basket is picked in the morning and I pick it up in the afternoon. You can't get much fresher than that. The taste is what food should taste like. A tomato tastes like a tomato not one of those cardboard tasteless things sold in the supermarkets. They practice sustainable agriculture that means they do not ruin the soil, there is no pesticide run off, and they rotate crops to keep the soil healthy for years to come. They provide nutritious food which means not putting pesticides into your body. And when you buy from them you support a local business and the money goes right back into the farm.

The CSA I joined is bi-weekly and I joined for a quarter which will provide us with a basket of fresh produce for the next 3 months. The amount of food in a regular size basket is quite large. They also offer a large basket but with just the two of us we would not be able to use the larger basket. Its' alot of food! Another advantage is that the cost of the basket is far less than I would spend if I went out and bought all the same items at the farmers market. Not only will we be eating better it will be less expensive. Gotta love that.

I can't wait to get my basket and see what's in it. I know there will be things in it that I may not be very familiar with and that fills me with anticipation. I want to learn how to eat some produce I may not have had before or that I have to figure out how to cook. I want to expand my food world.

The farm I found is: http://www.southcoastfarms.com/. You can log on and read about their business and what they have to offer. I found them via Chef Rich at Sage Restaurant, which we frequent. He still goes to the farmers market for ingredients for his kitchen and prides himself on finding small organic growers. That may be partly who he food tastes so good, besides the fact that he is a talented chef.


The picture is from the farm stand and all those tomatoes are organic heirlooms. Each variety has it's own unique flavor. I bought quite a few but within days they were gone. Can't wait to go back and get more.

I will blog about my experiences with the CSA which I am sure will be fun and interesting and I hope you will enjoy the ride with me.

Wednesday, August 5, 2009

Pesto Pasta Salad


Pesto Pasta Salad. Who does not love pesto?

The great thing about making pesto is that you can use different herbs, cheese and nuts to achieve a totally different taste. This recipe is different because it uses mayonnaise which adds a creaminess to the pesto you will never get otherwise. It may sound strange but every person who has ever tasted this salad thinks it is better than other pesto's they have had. Honest.

This recipe is for my sister Terri. I won't go into the details but suffice it to say that I fell short when asked for a pasta salad recipe.


This recipe is made with spinach and basil both of which I love. The spinach helps give it that bright green color and makes it healthy and the basil is traditional in pesto and gives it that familiar flavor. Be sure to always toast your nuts, it brings out the flavor and adds to the finished dish.


The recipe:
  • 3/4 pine nuts, toasted
  • 2 medium garlic cloves
  • 3 cups baby spinach leaves, about 4 ounces
  • 1 cup basil, about 1 ounce
  • 1/2 tsp ground black pepper
  • 2 tablespoons fresh lemon juice
  • 1/4 cup extra virgin olive oil
  • 6 tablespoons mayonnaise
  • 3/4 cup Parmesan cheese
  • 1 pint cherry or grape tomatoes, cut in half
  • 1 pound Farfalle (bow tie pasta)

Toast the pine nuts in a skillet over medium heat tossing every few seconds to prevent burning. This only takes a couple of minutes. Pine nuts burn easily so as soon as they get some brown on them turn the heat off. Set aside to cool.


To make the pesto put everything in the food processor: the garlic, spinach, basil, pepper, lemon, olive oil and 1/2 cup of the pine nuts and process just until smooth. Add the cheese and mayonnaise and pulse until just blended.


Cook the pasta in a large pot of boiling well salted water according to package directions. Allow to cool slightly.


To make the salad put the remainder of the pine nuts into a large bowl, add the pesto, the pasta, the tomatoes and toss well. Chill.


Warning. This recipe makes more pesto than you will probably need. I recommend you start off using about 2/3 of the pesto in your salad. I find that is enough. I take the remaining and keep it for another use.

I made this last weekend for a family reunion. The funny thing is that we had tables and tables full of food and three of my sister-in-laws knew immediately that I had made this salad.

Want to know a secret? If you really want to keep the green color fresh add a pinch of citric acid. It works beautifully. It will keep the leftover pesto bright green for days in your refrigerator. I know most people don't have citric acid but I now have it in my house because it is used for making cheese, and you all know about my obsession with cheese making right?


So Terri I hope you make this and everyone loves it!

Tuesday, August 4, 2009

Onions with Balsamic Glaze


Cipolle al Aceto - Onions with Balsamic Glaze


I was at the farmers market last weekend and found these Cipolle onions. I rarely buy them but decided I needed to expand my food world. Sometimes you just need to try something new. You can't eat the same thing week after week. So I bought a bag full and then proceeded to figure out what to do with them.


Cooking them in a balsamic glaze proved to be a winner. They are so flavorful. Serve them as part of an antipasto or on a salad. I went to an outdoor movie night and brought them as part of our picnic. They were a big hit!


The recipe:
  • 1/4 cup olive oil
  • 3 Tablespoons unsalted butter
  • 2 pounds onions, cut in half and peeled
  • 2 Tablespoons sugar
  • 1 cup balsamic vinegar
  • 1 cup water
  • 1 teaspoon fresh rosemary, chopped
You can use large Spanish onions or red onions and cut them in half. Because I used the small Cipolle I left them whole.


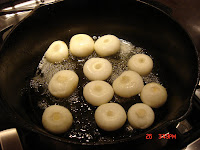
Heat the olive oil in a heavy saute pan, I used my old cast iron skillet, then add the butter and cook until the foam subsides. Add the peeled onions cut side down and saute until light golden brown, 8 to 10 minutes.


Add the sugar, vinegar, water and rosemary and bring to a boil, stirring occasionally. Keep on eye on them so the sauce does not reduce too quickly and burn. Cook the onions, uncovered, until the onion are tender and the liquid has reduced to a glaze. This might take about 20 minutes. If the liquid cooks off too quickly add a little more water. You want the onions to be done all the way through and the liquid to be a glaze consistency but not burn.


You can serve these right away but I like to put them in a jar and refrigerate them for a few days. I think they taste richer and deeper after sitting a few days. If refrigerated take them out and allow to come to room temp before serving.